

Generative Models have transformed the landscape in many areas, such as Generative Imagery. Many of you may remember the release of models like DALL-E Mini (Craiyon), DALL-E 2 and most notably the Open-Source Stable Diffusion. Stable Diffusion 1.5 is probably one of the most popular image generation models with a big Community. Many innovations such as Textual Inversion, ControlNet, T2I Adapters or LoRAs found a home quickly with Stable Diffusion.
On July 26 Stability AI has published this Blog Post announcing the official release of the next generation model of Stable Diffusion XL 1.0. The Examples and the Statistics shown in their Announcement, have surely shown a great leap forward from the previous SD2 and SD1 Model-Iterations.
In this Blog Post, we want to show you the Magic of SDXL and lift the curtains of some technical details. We will be using SDXL with the diffusers library. As you will see, it will be quite easy to build a pipeline with SDXL and get started generating your own images. We will be building a Jupyter Notebook together, that you can then use for inference on your local machine, in colab or on a GPU Cloud Server of your choice.
Brief Technical Overview
SDXL is currently probably the State of the Art Open Source Image Generation Model. It also compares well against propiertary Models such as Midjourney, as we will discuss later.
Some Optimizations were made in comparison to the previous SD1.x and SD2.x Models, that improve perceived quality, better adherence to the prompt and a higher resolution. Some of these are achieved through an Enhanced Architecture, through Improved Conditioning, and through an optional Refinement Model. Let’s talk about these points briefly.
The Architecture
As many may already know, SD1.x and SD2.x use a U-Net Architecture. This hasn’t changed with Stability’s new SDXL Model, however the details of the U-Net have changed in some notable ways. While the SD1.x and SD2.x Models use 4 Feature Layers with one Transformer Block each, the SDXL Model Architecture omits the highest transformer level Block and removes the lowest level 8x downsampling in the U-Net. The general shape ends up to be [0, 2, 10] in comparison to [1, 1, 1, 1]. The amount of parameters also have changed from 860M (SD1.x) and 865M (SD2.x) to 2.6B parameters in the U-Net. SDXL also utilizes two pre-trained Text-Encoders: CLIP ViT-L and OpenCLIP ViT-bigG while SD1.x and SD2.x only use one Textencoder: CLIP ViT-L (SD1.x) and OpenCLIP ViT-H (SD2.x). The Context dimensions also change from 768 (SD1.x) and 1024 (SD2.x) to 2048. Last but not least, SDXL also uses Pooled Text embedings with OpenCLIP ViT-bigG, while SD1.x and SD2.x does not use any Pooled Text embeddings.
The Refiner
The Refiner Model has been introduced with SDXL. It is an optional Latent Diffusion Model that operates within the same Latent Space as the original Base SDXL Model and is specialized on high-quality high-resolution Data and improves the quality of the Generated Image in some details such as Backgrounds or Faces. It features a 6.6B parameter U-Net. It uses the same Text Embeddings and incorporates the noising-denoising technique pioneered by SDEdit on the latents of the Base Model. SDEdit entails introducing noise to a given image and subsequently employing a stochastic differential equation (SDE) to methodically denoise the image, thus improving its realism or detail.
The Refiner can be used in two different suggested Pipelines:
- Ensemble of Experts Pipeline: The Base Model produces noisy latents that are denoised in the final steps by the Refinement Model. In this Example, the Base Model Operates as a standalone Module.
- Two-state Pipeline: The Base Model produces the desired-size latents and a specialized high-res Model with SDEdit refines the first-step latents. However this method is operatively slower due to extra function evaluations.
Improved Conditioning
SDXL introduced some new techniques to improve the quality and diversity in Aspect-Ratios and to improve Cropping Issues in generated Images that were introduced by Random Cropping during training. The size of Images has also increased to ~1024x1024px in total pixel count.
To improve the diversity and quality with different Aspect-Ratios, Various Aspect-Ratios were used during training that approach a total pixel count of roughly 1024x1024pixels.
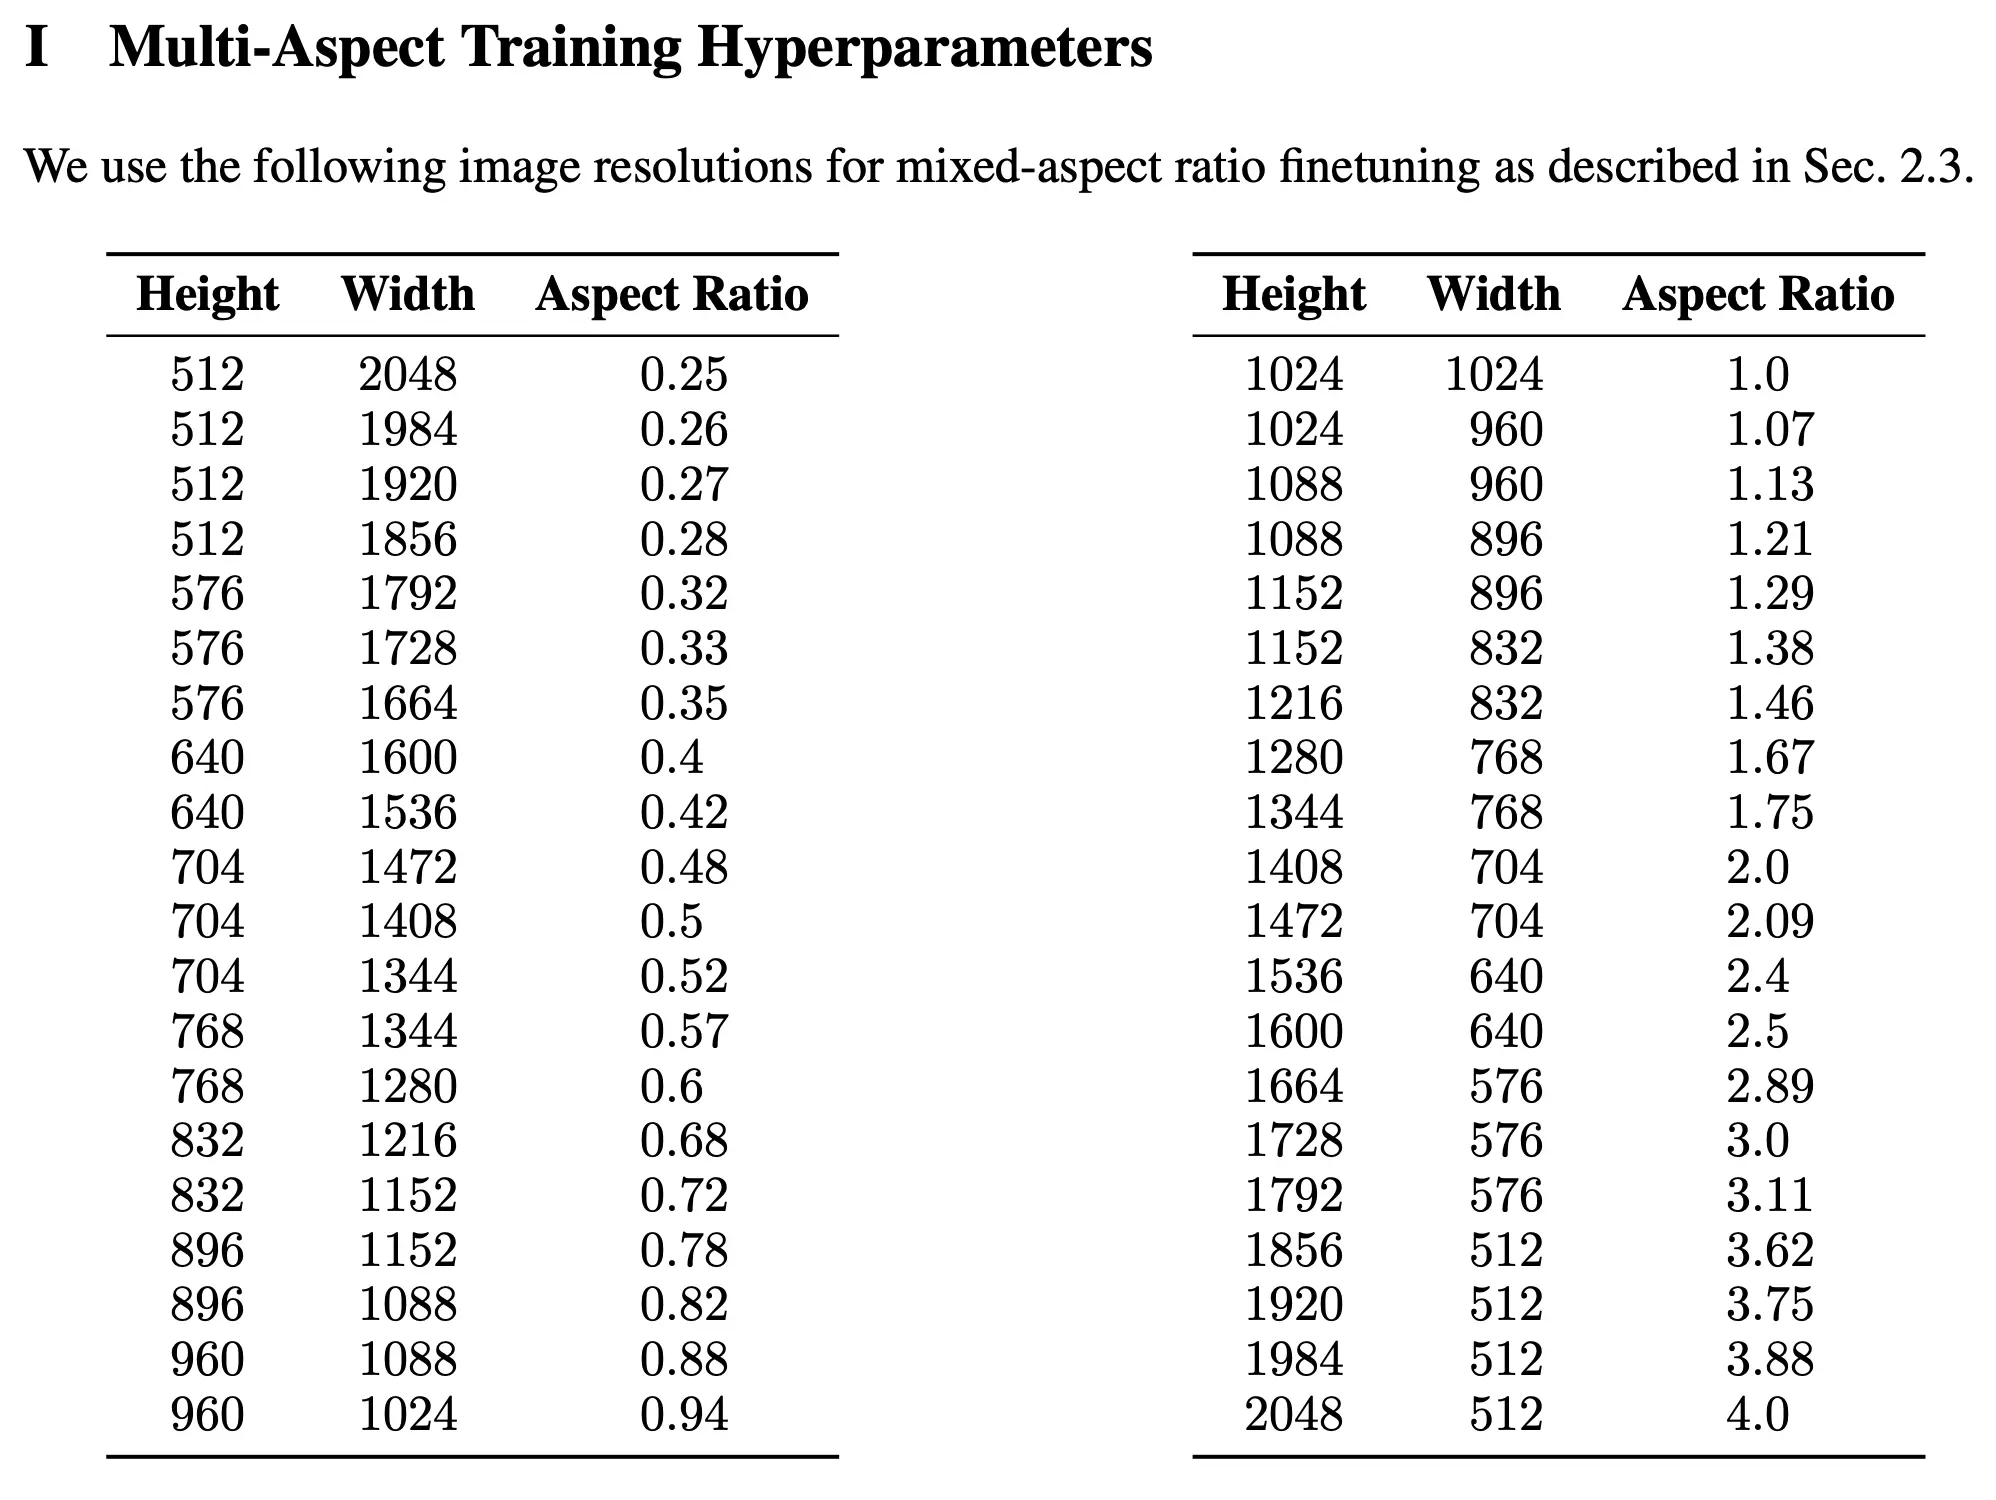
The Training Data has been partitioned into buckets of different aspect ratios, while each training batch consists of images from the same bucket the training alternates between bucket sizes. Crop-Conditioning (see below) and multi-aspect training are also combined for efficiency purposes.
To tackle previous issues with random crops in generated Images by SD1.x and SD2.x, Crop-Coordinates have been included as a Conditioning Parameter in the form of Fourier feature embeddings. This trick, requires no extra data preperation and adds more control for image synthesis. The previous issue of images being undesirable cropped seem to have been drastically reduced as shown in the example below.
Base - Refiner Generation Process
In general, Random Noise is generated that is being denoised by the Base Model with a Noise Descheduler in n steps. The Base Model is fed with Text Embeddings from CLIP ViT-L and OpenCLIP ViT-bigG and Pooled Text Embeddings from OpenCLIP ViT-bigG to guide the Denoising Process to a generated Image. The Latents are then either directly passed to the VAE Decoder to generate RGB represented Images from the Latents or are optionally passed to the Refiner Model who continues denoising with the same Text Embeddings to produce a Refined Latent that then gets passed to the VAE Decoder to return the final Image. In the Diffusers implementation, the n denoising steps are distributed according to the defined noise_frac. In a suggested Ratio of 80 (Base) - 20 (Refiner) (noise_frac of 0.8) would equal to 32 steps on the Base Model and 8 on the Refiner if n_steps equals to 40. Alternatively, an Image can also be converted back to Latents and then refined by the refiner.

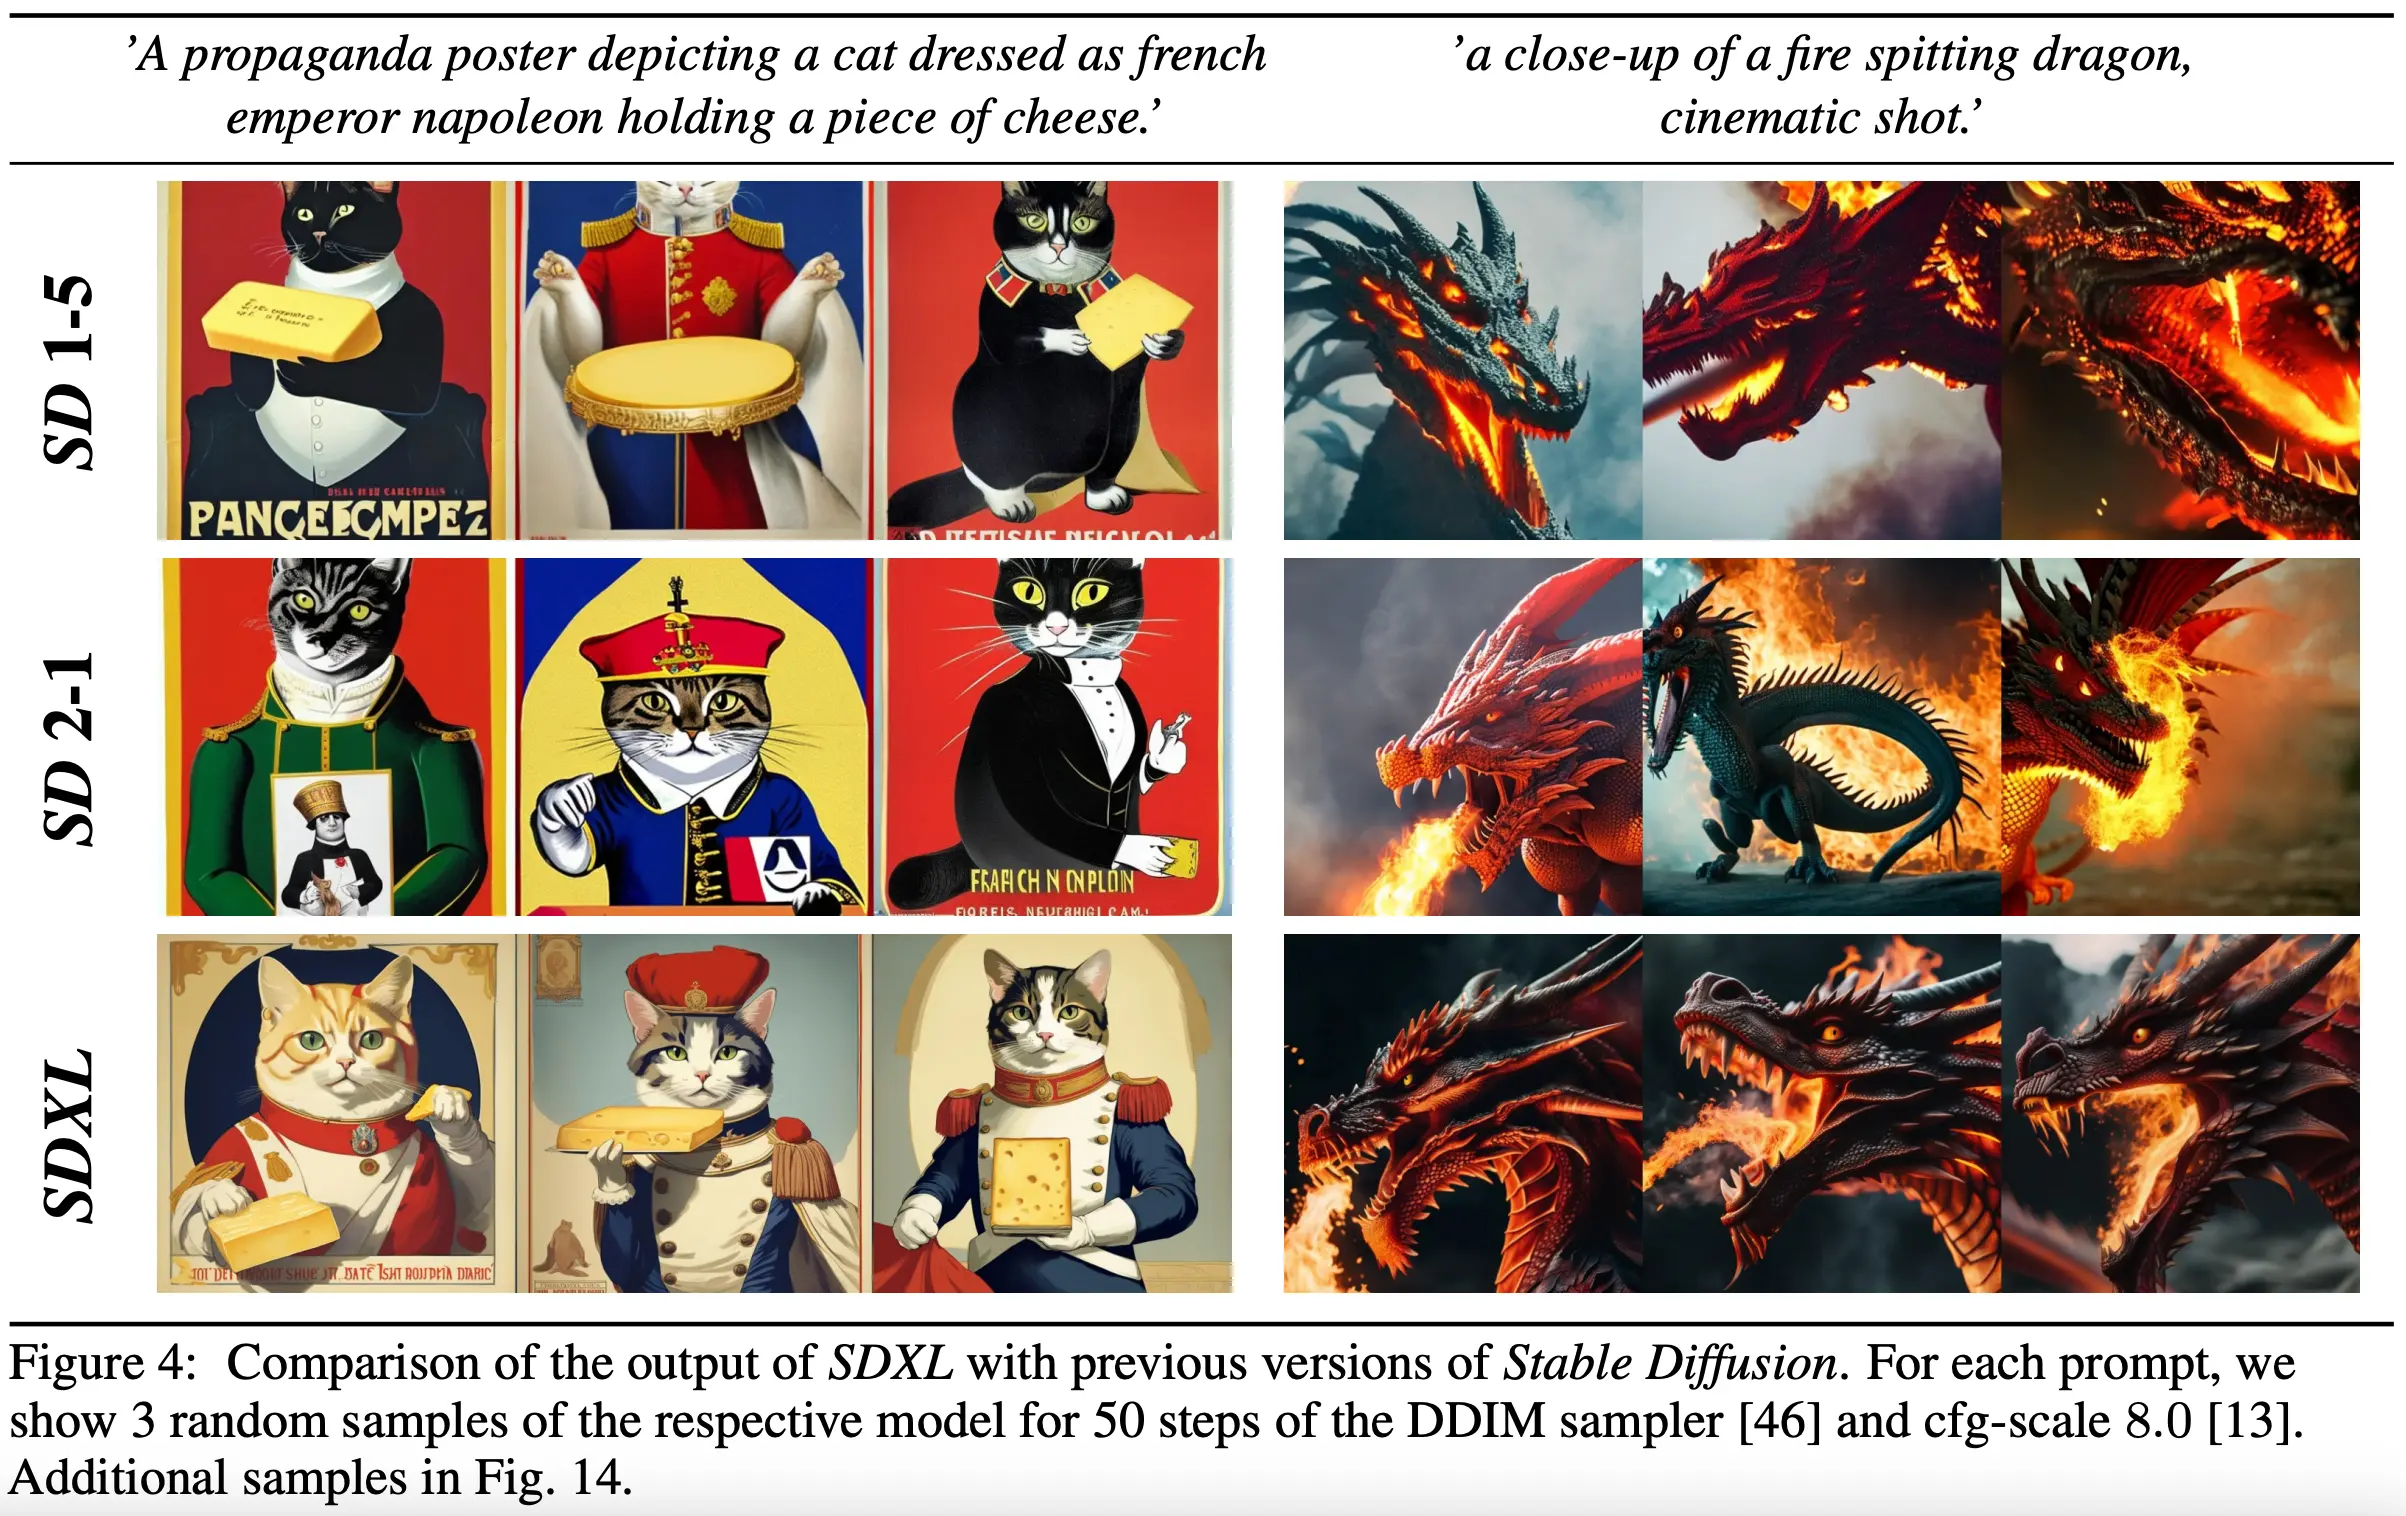
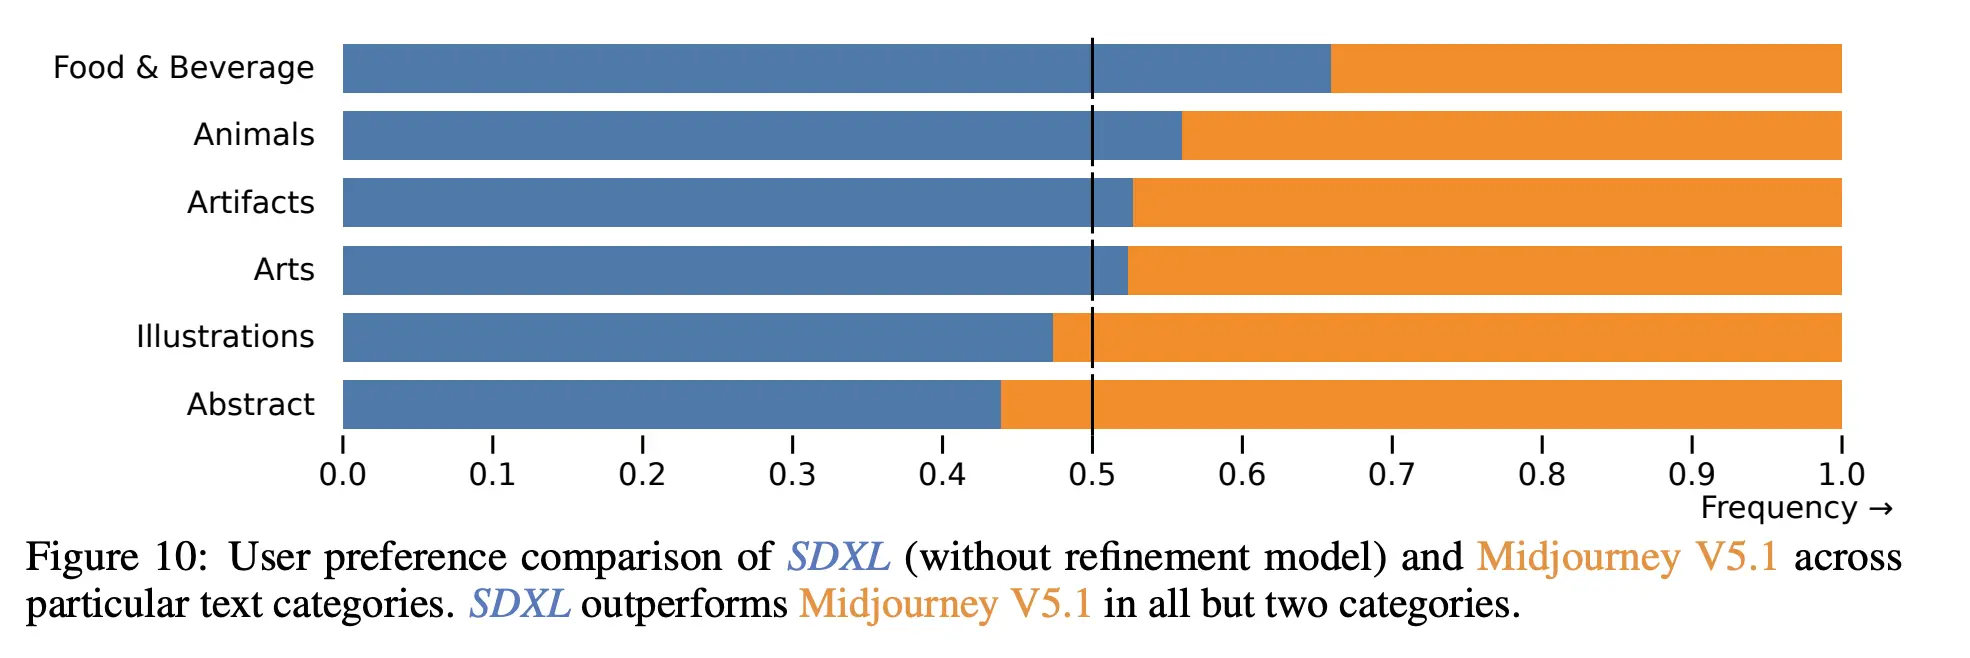
Comparable Quality with other SOTA Models such as Midjourney
In a user study, SDXL0.9 was compared with Midjourney 5.1. The overall preference according to Prompt allignment seems to be a bit higher on SDXL0.9 while depending on the category, SDXL may have significantly higher preference rates than Midjourney. In fewer cases, Midjourney has the upper hand.
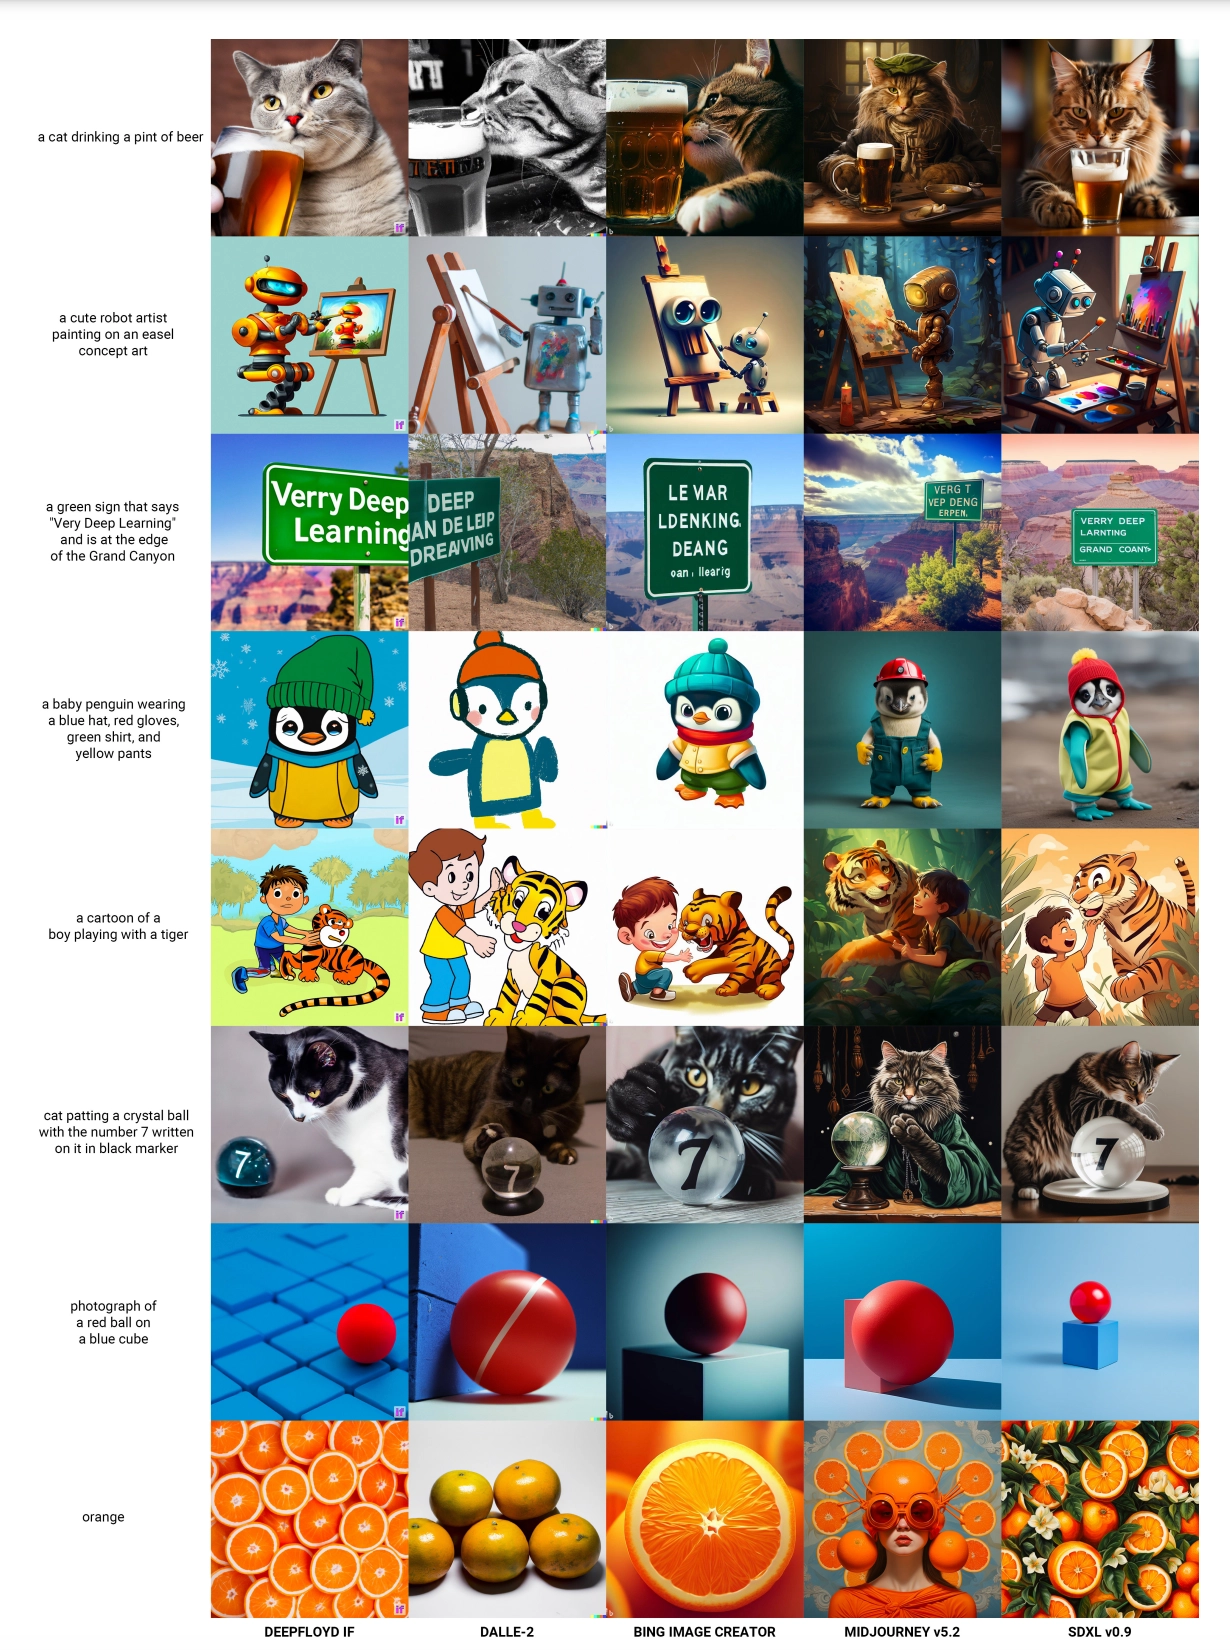
A general comparison with Results of various Prompts comparing SDXL0.9 with DeepFloyd IF, DALLE-2, Bing Image Creator, and Midjourney V5.2 can be seen below.
Limitations
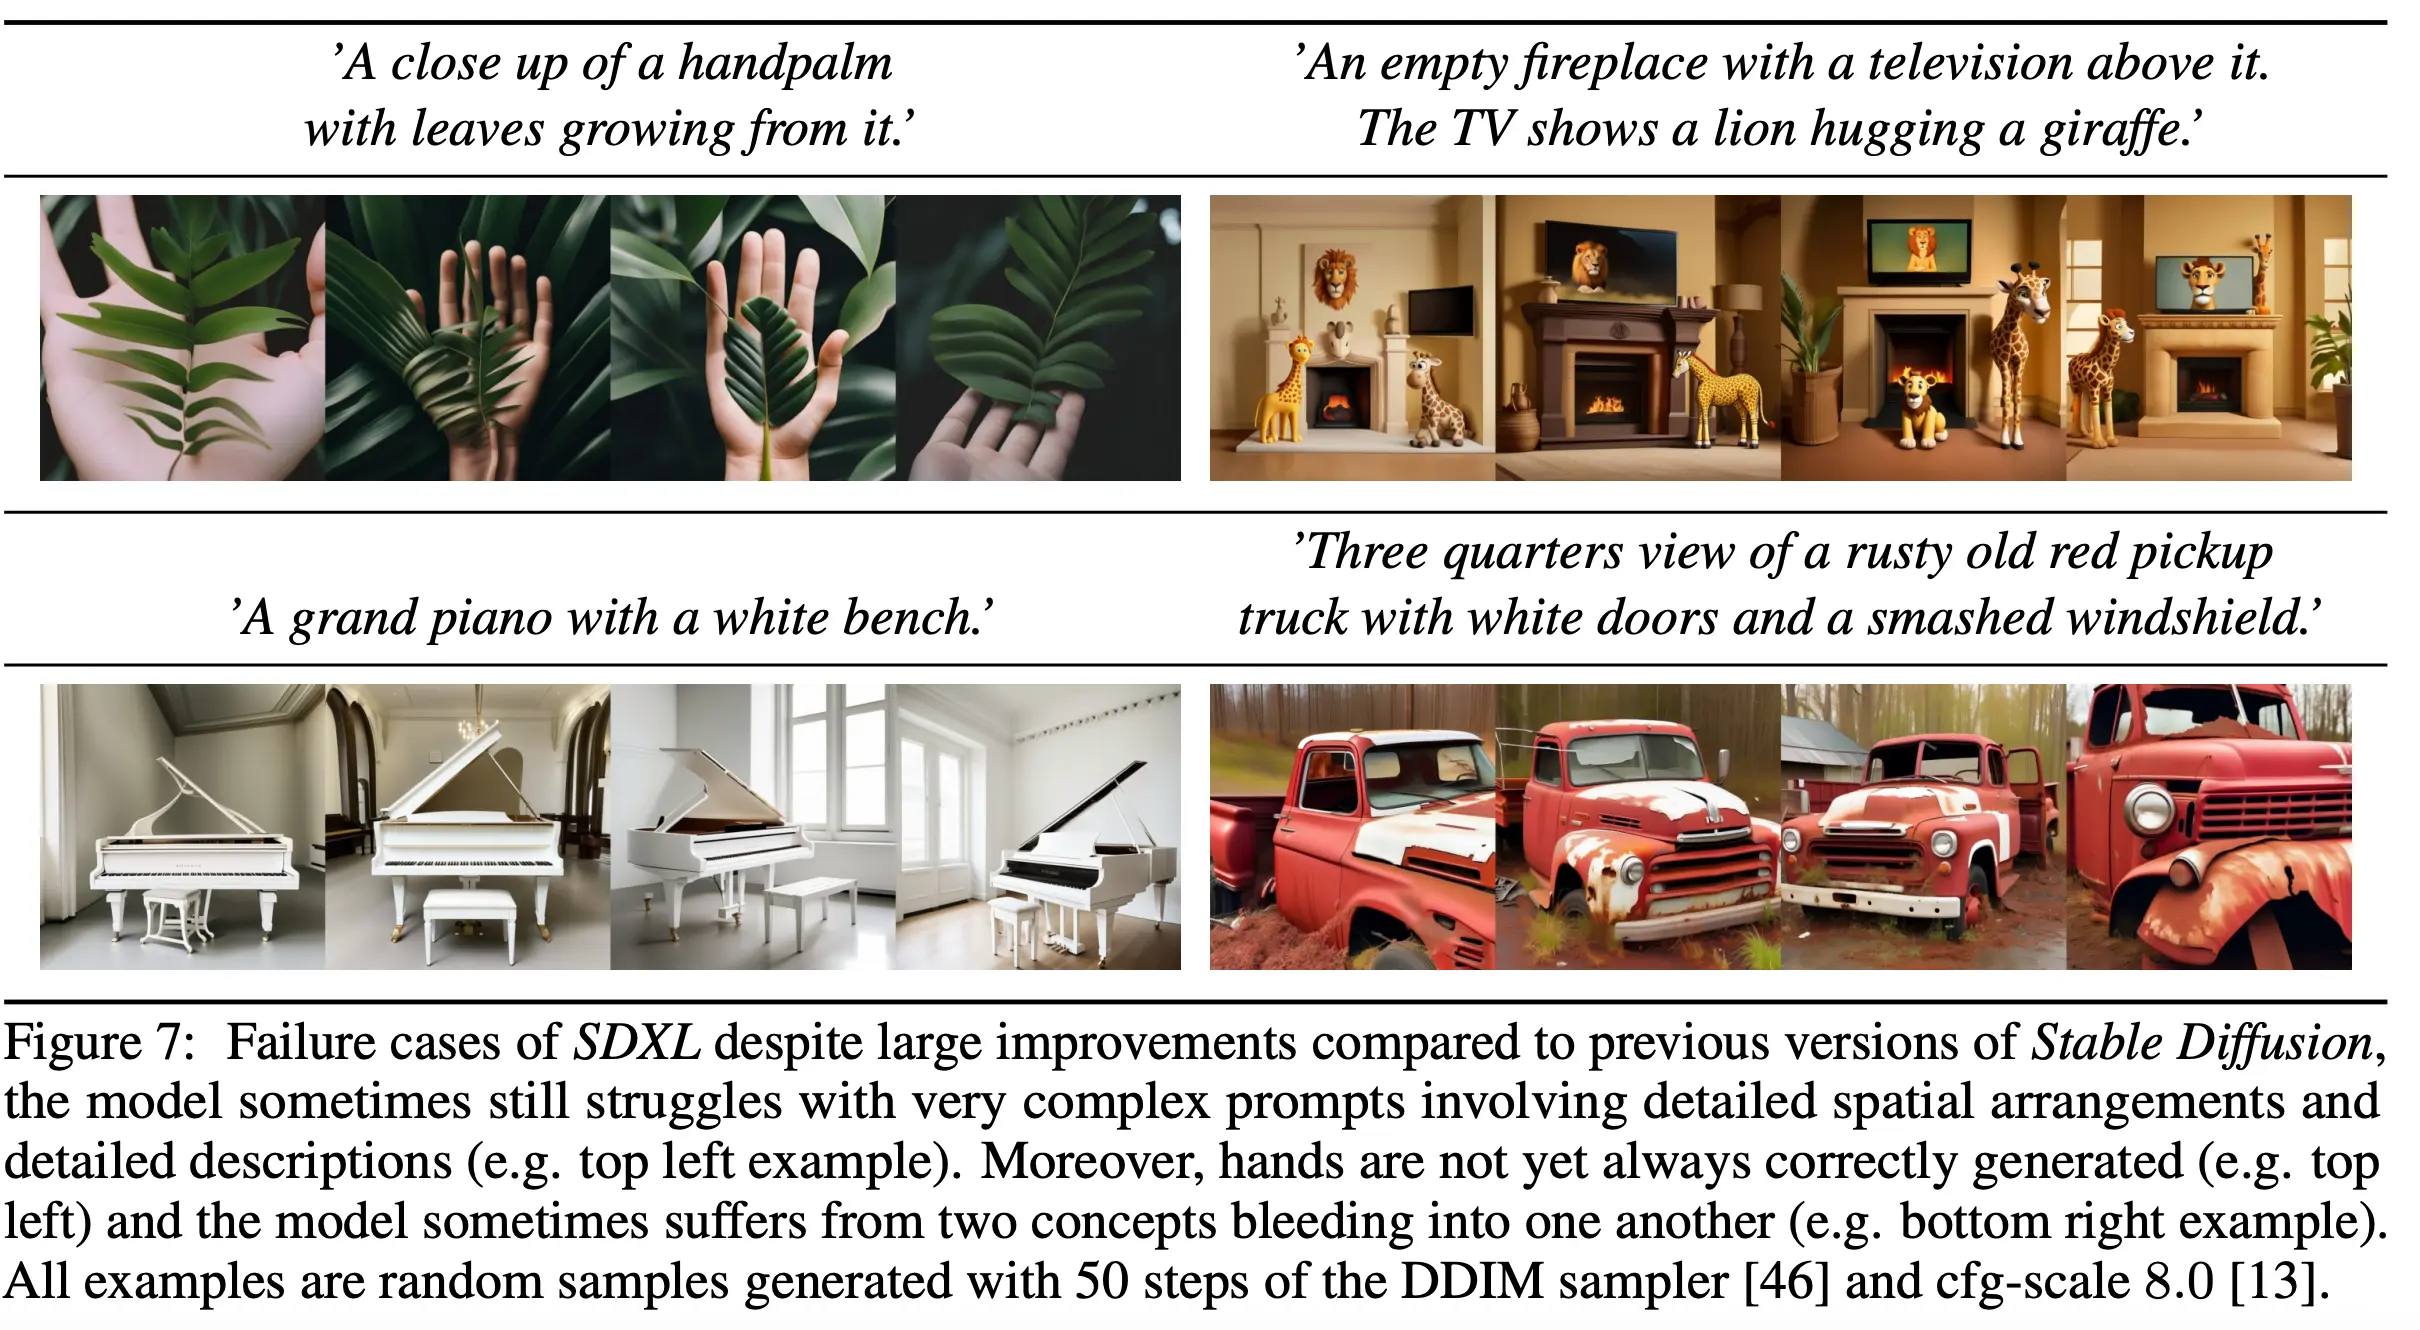
As with previous Publications, some Limitations arise. SDXL has various issues, such as difficulties in synthesizing complex structures like human hands, failing to achieve full photorealism, showing bias from the used large-scale Datasets like social and racial biases, bleeding concepts of objects and attributes in the image and issues with rendering long readible text e.g. introducing random characters. If you want to know more about the Limitations, we recommend reading the original Paper.
Prerequisites for inference
We assume you run a virtual environment such as conda for local inference and a Cuda Compatible GPU with high VRAM. Later in this guide, we will also provide Links to Example Notebooks and Colabs for you to try out. If you don’t have a good GPU you may also try out Google Colab to run this tutorial. In that case, you may skip the virtual environment and jupyter setup.
Creating a virtual environment and installing dependencies
First let us begin with creating a new environment for this tutorial and activating it afterwards:
conda create -n sdxl python==3.10
conda activate sdxl
Now, let us install any necessary packages we need for this tutorial:
pip install jupyter torch diffusers["torch"] transformers accelerate ipywidgets invisible-watermark>=0.2.0
jupyter is necessary for us to utilize notebooks and ipywidgets helps us creating interactable widgets. The torch (PyTorch) Package is necessary for running the Neural Network for SDXL. We then install diffusers["torch"] and it’s dependency transformers to utilize the SDXL Pipeline. accelerate is optional, but improves inference with utilizing offloading some things to the CPU. invisible-watermark is recommended for installation as it helps marking generated images as AI generated.
Now, let’s start the jupyter server. Simply run:
jupyter notebook \
   --port=8888
This will start a jupyter notebook session on port 8888.
In newer versions, the token is not printed to the console anymore directly. In that case, open a new console window. Now enter:
jupyter server list
And then click on the url printed. That will open a new window with your jupyter notebook. Alternatively, you can also utilize the VSCode Extension for Jupyter Notebooks and enter the URL under Select Kernel > Select another Kernel > Existing Jupyter Server and pasting the url including token into the window and pressing Enter.
This will be all we need to get started with the Library!
Using the Base Model
First let us begin by creating a simple DiffusionPipeline:
from diffusers import DiffusionPipeline
import torch

base_pipeline = DiffusionPipeline.from_pretrained(
    "stabilityai/stable-diffusion-xl-base-1.0", torch_dtype=torch.float16, variant="fp16", use_safetensors=True
)

base_pipeline.to("cuda", torch.float16)
First, we create a DiffusionPipeline from the pretrained stabilityai/stable-diffusion-xl-base-1.0 Checkpoint and load it as a torch.float16 dtype. We also make sure to use the safetensors variant. The Checkpoint automatically creates a StableDiffusionXLPipeline and loads the model weights. We then load the Pipeline into the GPU Memory through cuda. Specifying the dtype when loading it to cuda may not be necessary, but the figured that on some systems not explictly defining it may cause issues. If you have issues with GPU memory, you may instead try to specify base_pipeline.enable_model_cpu_offload() instead of base_pipeline.to("cuda", torch.float16). This allows to offload some processes to CPU and RAM.
Now let’s begin generating a simple image:
from IPython.display import display as disp
from torch import Generator
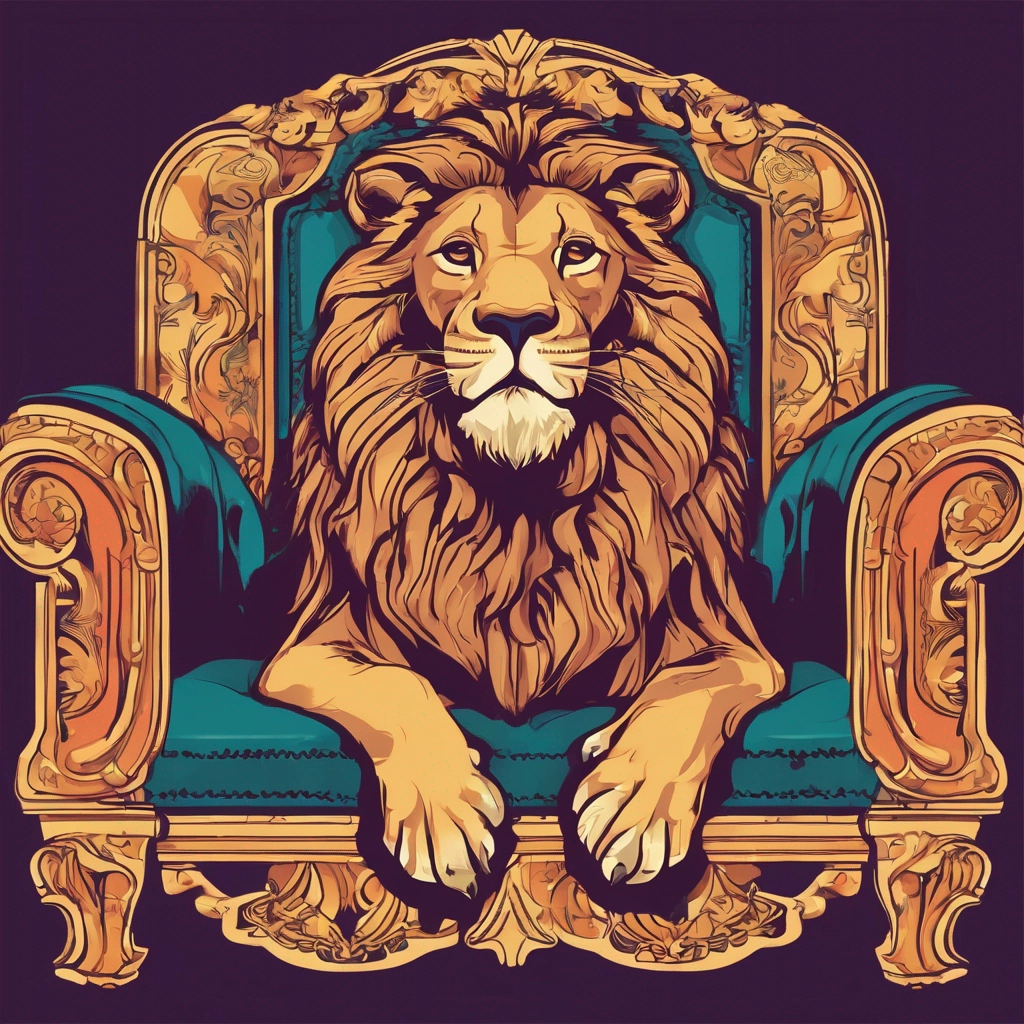
seed = 123
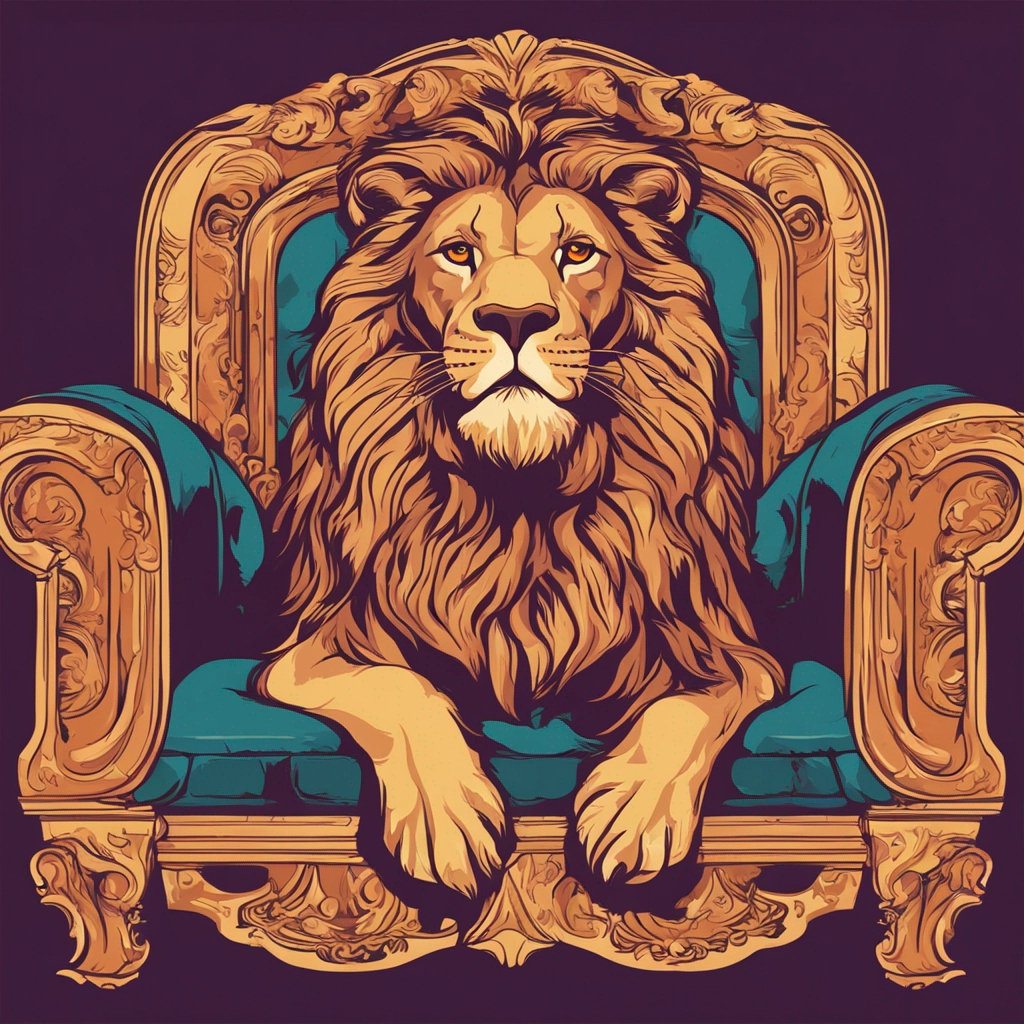
positive_prompt = "Colorful Roaring Lion sitting on a victorian couch, flat icon, vector"
generator = Generator(device="cuda").manual_seed(seed)
image = base_pipeline(
prompt=positive_prompt,
generator=generator).images[0]
disp(image)
Generating an image is quite easy. If we fallback to default values, we only have to specify a prompt and we can already generate an image. In our example, we also added a torch.Generator to specify a seed, so results are more consistent for comparison. We then simply display our result in the notebook. Let’s have a look at the output in our example:
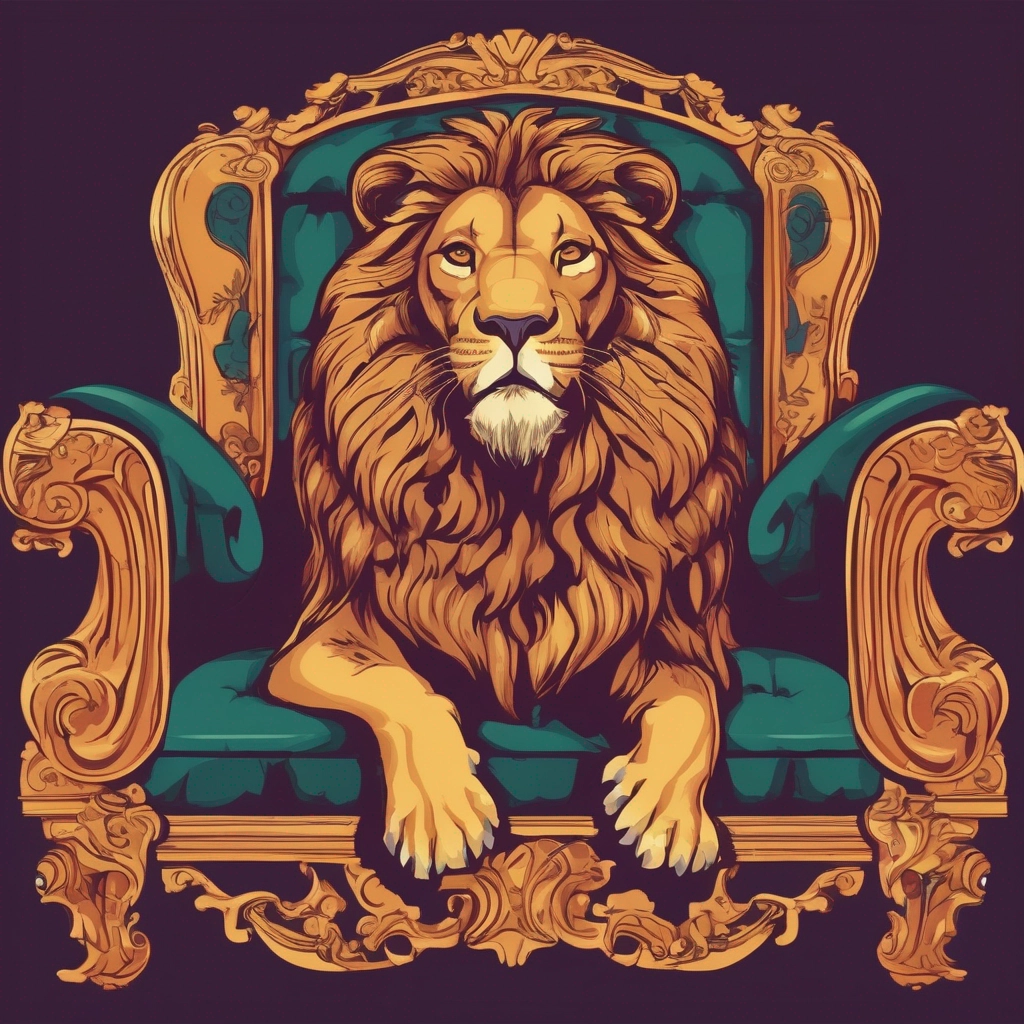
Please note, that results may differ depending on your seed and hardware. Using the same seed does not necessairly produce the same result but makes results consistent. In our example, we generated the Lion Image with a T4 GPU.
We can also specify more hyperparameters, such as the amount of steps, width, height and a negative prompt:
from IPython.display import display as disp

seed = 123
steps = 50
width = 1024
height = 1024
positive_prompt = "Colorful Roaring Lion sitting on a victorian couch, flat icon, vector"
negative_prompt = "realistic, realism, photograph"
generator = Generator(device="cuda").manual_seed(seed)

image = base_pipeline(width=width,
             height=height,
             num_inference_steps=steps,
             prompt=positive_prompt,
             negative_prompt=negative_prompt,
             generator=generator).images[0]

disp(image)
Great, now we added a prompt of things we want to avoid as a negative_prompt in our image, specified the height, width and the total amount of steps that will be used to denoise the image. Note, that some of these values were default. Let’s have a look:
Using different aspect ratios
As discused in the Technical Overview, the model has been trained to handle more Aspect Ratios to not only generate 1:1 Images but also approach popular Aspect Ratios such as 16:9. Speaking of which, let’s generate an Image in roughly that Aspect Ratio, note that it’s not exact, as we have to abide by the rule that the height and width are divisible by 8:
from IPython.display import display as disp
seed = 123
steps = 50
width = 1344
height = 768
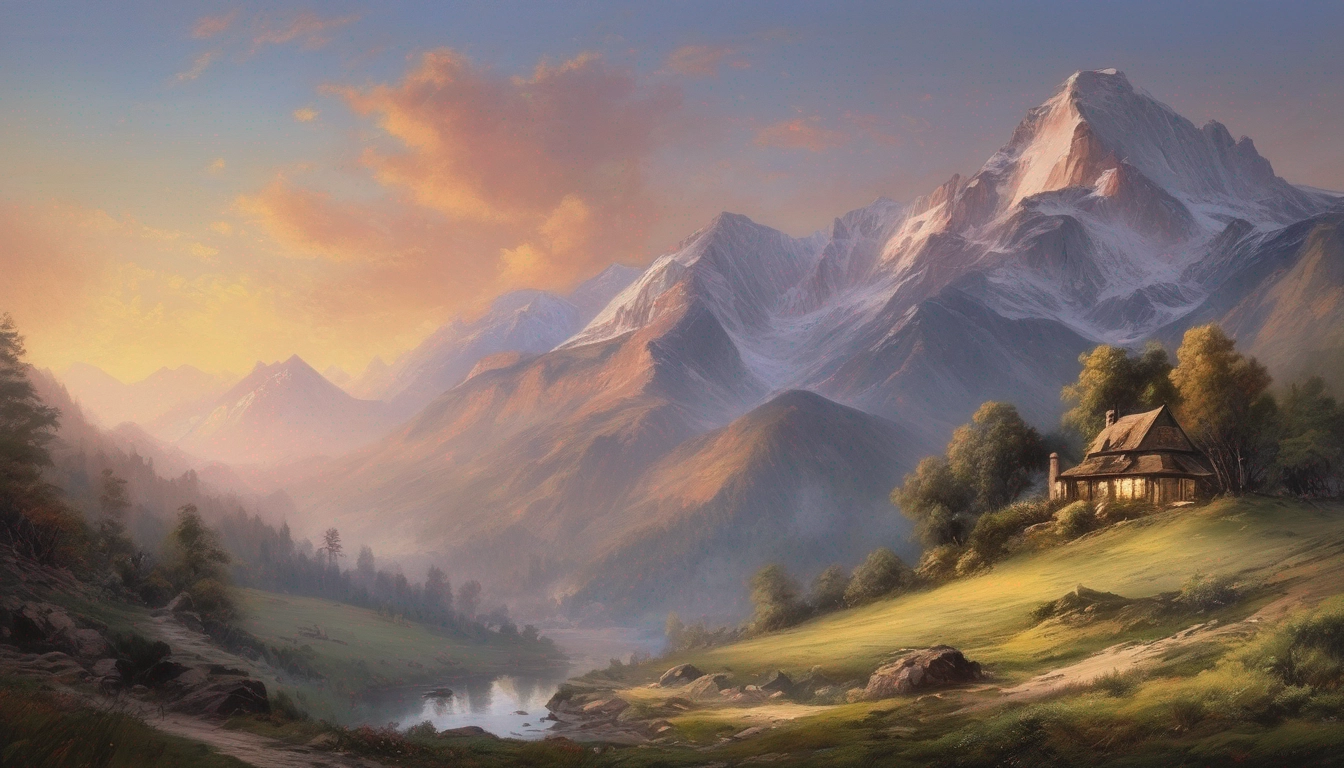
positive_prompt = "Beautiful Mountain Landscape, dawn, victorian painting, high quality"
negative_prompt = "Bad quality, artifacts, low quality, lowres, deformed, malformed, photograph, hyperrealism, photo, bad artist"
generator = Generator(device="cuda").manual_seed(seed)
image = base_pipeline(width=width,
height=height,
num_inference_steps=steps,
prompt=positive_prompt,
negative_prompt=negative_prompt,
generator=generator).images[0]
disp(image)
As long as the pixel count approaches ~1024x1024px in total, we should get the optimal quality. Let’s take a look at our painting:
Great! Let’s go ahead and do the same for a 9:16 Phone Wallpaper:
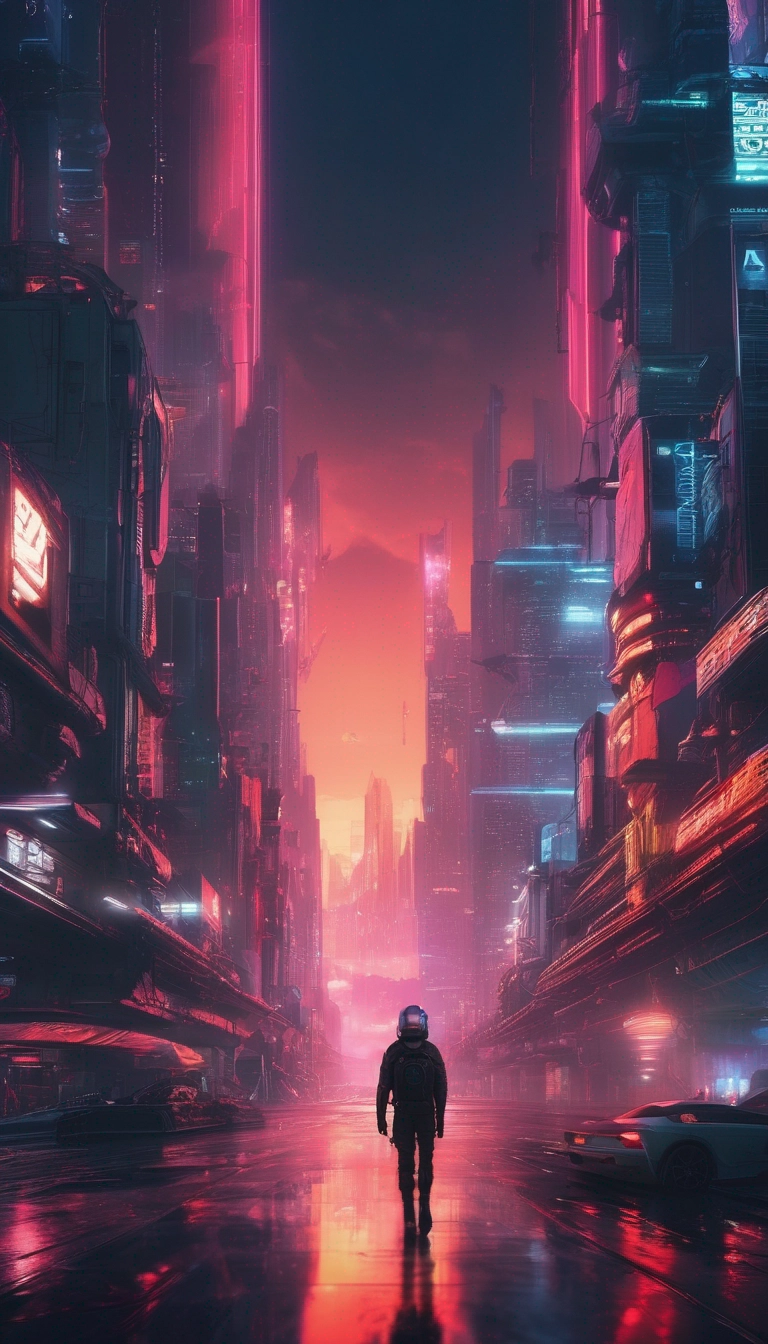
from IPython.display import display as disp

seed = 123
steps = 50
width = 768
height = 1344
positive_prompt = "Sci-Fi City Landscape, Cyberpunk, Phone Wallpaper, 8k, high quality"
negative_prompt = "Bad quality, artifacts, low quality, lowres, deformed, malformed, bad artist"
generator = Generator(device="cuda").manual_seed(seed)

image = base_pipeline(width=width,
             height=height,
             num_inference_steps=steps,
             prompt=positive_prompt,
             negative_prompt=negative_prompt,
             generator=generator).images[0]

disp(image)
Let’s have a peek:
If you wish to generate different Aspect Ratios, take a look at the Table we put in the Technical Overview from the Paper.
Changing the Scheduler
By default, the EulerDiscreteScheduler is used. However, other Schedulers may be interesting, as some produce a higher quality, have faster inference speeds, take less steps for denoising etc. So let’s see how we can do that. First, we will check out the compatible schedulers:
base_pipeline.scheduler.compatibles
As of time of this Blog Post this were the compatible schedulers:
[diffusers.utils.dummy_torch_and_torchsde_objects.DPMSolverSDEScheduler,
 diffusers.schedulers.scheduling_dpmsolver_singlestep.DPMSolverSinglestepScheduler,
 diffusers.schedulers.scheduling_k_dpm_2_ancestral_discrete.KDPM2AncestralDiscreteScheduler,
 diffusers.schedulers.scheduling_deis_multistep.DEISMultistepScheduler,
 diffusers.schedulers.scheduling_k_dpm_2_discrete.KDPM2DiscreteScheduler,
 diffusers.schedulers.scheduling_lms_discrete.LMSDiscreteScheduler,
 diffusers.schedulers.scheduling_ddim.DDIMScheduler,
 diffusers.schedulers.scheduling_pndm.PNDMScheduler,
 diffusers.schedulers.scheduling_ddpm.DDPMScheduler,
 diffusers.schedulers.scheduling_unipc_multistep.UniPCMultistepScheduler,
 diffusers.schedulers.scheduling_euler_ancestral_discrete.EulerAncestralDiscreteScheduler,
 diffusers.schedulers.scheduling_euler_discrete.EulerDiscreteScheduler,
 diffusers.schedulers.scheduling_heun_discrete.HeunDiscreteScheduler,
 diffusers.schedulers.scheduling_dpmsolver_multistep.DPMSolverMultistepScheduler]
Great, let’s say, we want to switch to the HeunDiscreteScheduler. It’s quite easy to do that:
from diffusers import HeunDiscreteScheduler

base_pipeline.scheduler = HeunDiscreteScheduler.from_config(base_pipeline.scheduler.config)
We simply set the scheduler by changing the property on the pipeline to the HeunDiscreteScheduler which we can initialize with the config of the old EulerDiscreteScheduler. You may also tinker the config, also you’d like, however for the sake of simplicity we do it the easiest way possible.
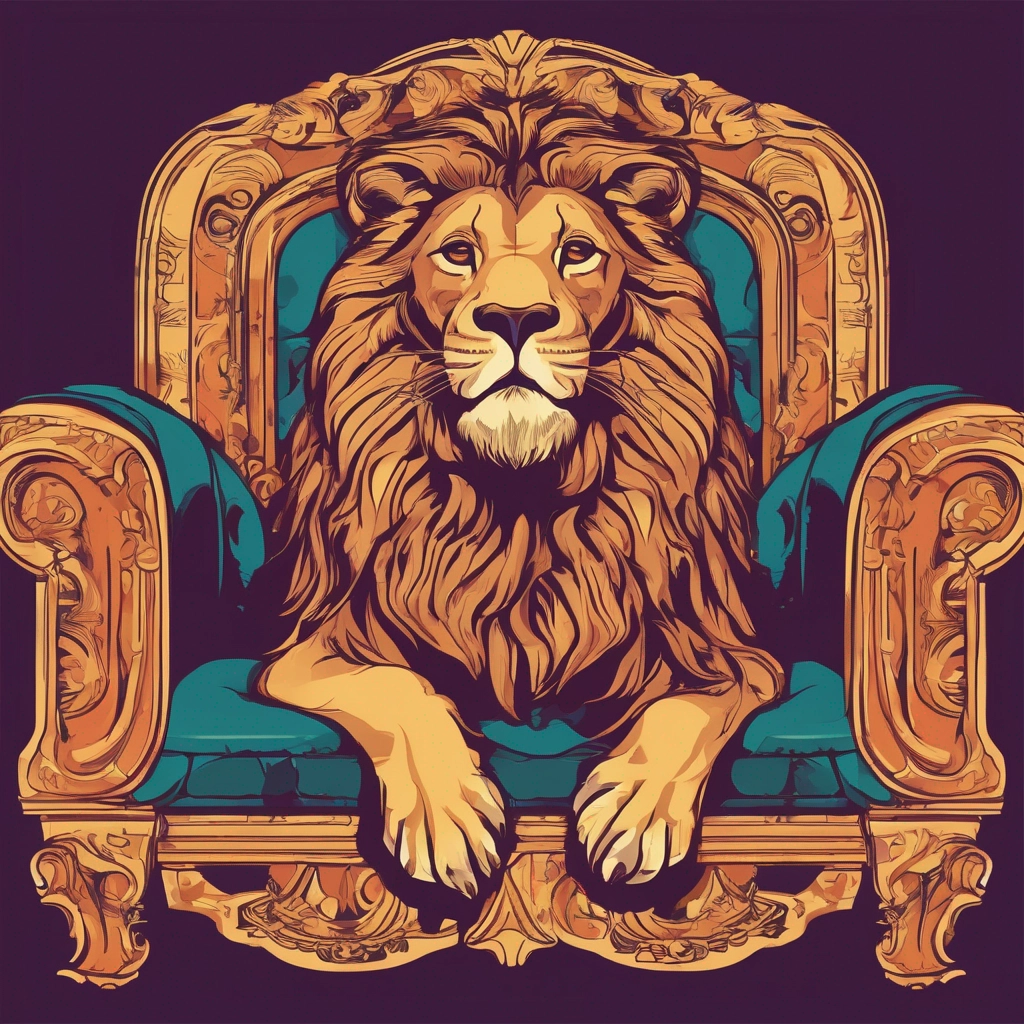
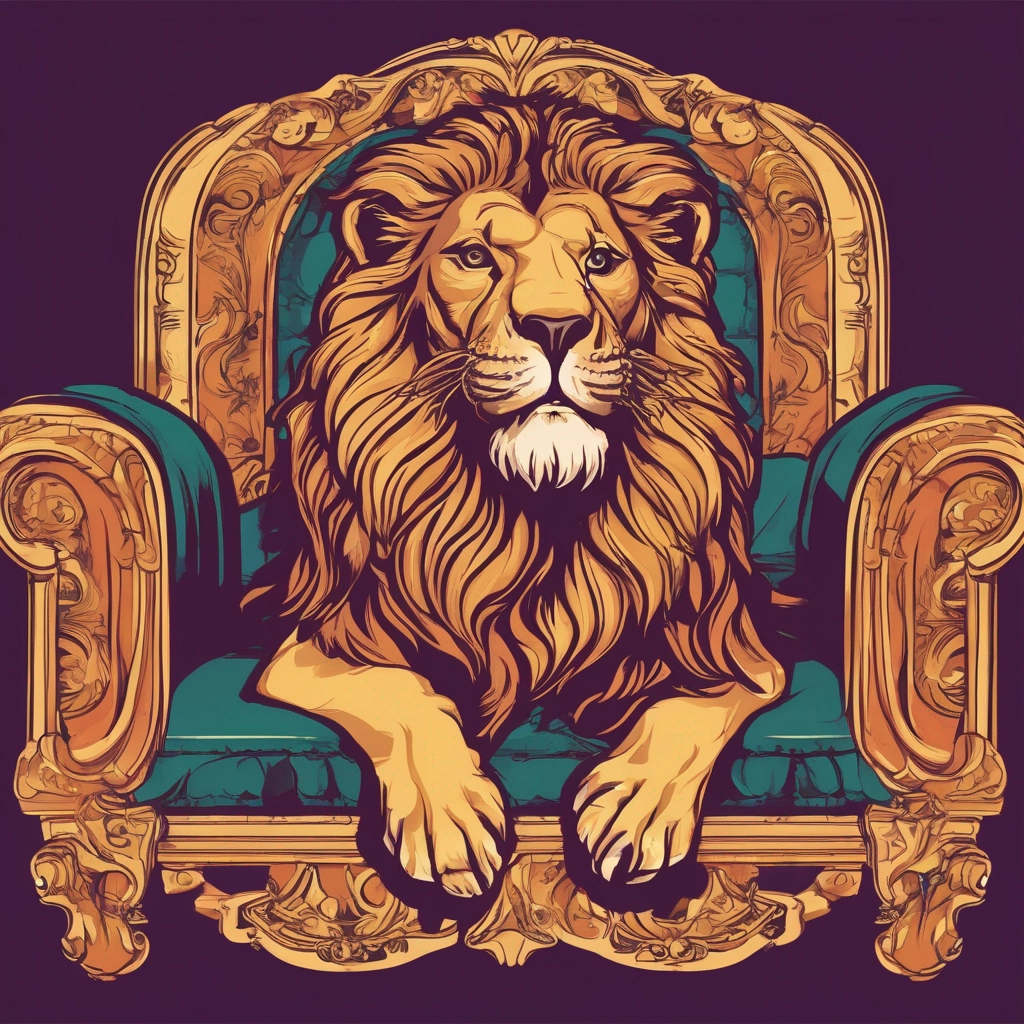
Now, let’s generate the previous Lion Image with the HeunDiscreteScheduler:
from IPython.display import display as disp

seed = 123
steps = 50
width = 1024
height = 1024
positive_prompt = "Colorful Roaring Lion sitting on a victorian couch, flat icon, vector"
negative_prompt = "realistic, realism, photograph"
generator = Generator(device="cuda").manual_seed(seed)

image = base_pipeline(width=width,
             height=height,
             num_inference_steps=steps,
             prompt=positive_prompt,
             negative_prompt=negative_prompt,
             generator=generator).images[0]

disp(image)
The result has changed, but we can still see that the Images look similar:
In this example, you may see some subtle differences such as the seam in the chair or other details.
Now let’s change it back to the default EulerDiscreteScheduler:
from diffusers import EulerDiscreteScheduler

base_pipeline.scheduler = EulerDiscreteScheduler.from_config(base_pipeline.scheduler.config)
Using Extended Token lengths and Weights in Prompts with Compel:
A difference you may notice, in comparison to using UI’s like Automatic1111’s Webui is that the Lengths of the prompts are limited to 77 Tokens. This is due the Limitations in the Text Embedding Tensors. However, we can use a Library called Compel to extend the Token Windows with some trickery and also add Weights to the Tokens we add.
Let’s begin with using Weights in the Prompt:
from compel import Compel, ReturnedEmbeddingsType
from IPython.display import display as disp

c_seed = 123
c_steps = 50
c_height = 1024
c_width = 1024
c_positive_prompt = "Colorful Roaring Lion sitting on a (victorian)1.2 couch, (flat icon)+, vector+"
c_negative_prompt = "realistic, realism, photograph"
c_generator = torch.Generator(device="cuda").manual_seed(c_seed)

compel = Compel(tokenizer=[base_pipeline.tokenizer, base_pipeline.tokenizer_2],
                text_encoder=[base_pipeline.text_encoder, base_pipeline.text_encoder_2],
                returned_embeddings_type=ReturnedEmbeddingsType.PENULTIMATE_HIDDEN_STATES_NON_NORMALIZED,
                requires_pooled=[False, True])

# Create prompt embeds and pooled prompt embeds
p_conditioning, p_pooled = compel(c_positive_prompt)
n_conditioning, n_pooled = compel(c_negative_prompt)
# generate image
image = base_pipeline(width=c_width,
            height=c_height,
            prompt_embeds=p_conditioning,
            pooled_prompt_embeds=p_pooled,
            negative_prompt_embeds=n_conditioning,
            negative_pooled_prompt_embeds=n_pooled,
            num_inference_steps=c_steps,
            generator=c_generator).images[0]

disp(image)
First, we initialize Compel with the tokenizers of our Base Model and the Text encoders. We then specify the returned embeddings type to be ReturnedEmbeddingsType.PENULTIMATE_HIDDEN_STATES_NON_NORMALIZED and set requires_pooled equal to [False, True]. Then, we can create the normal and pooled prompt embeds by passing the positive prompt and negative prompts respectfully. We can then pass these to prompt_embeds, pooled_prompt_embeds, negative_prompt_embeds and negative_pooled_prompt_embeds accordingly.
Simply, we can add + or - at the end of a word, that gets weights equal to 1.1^n (+) or 0.9^n (-) where n is equal to the amount of + or - we append to it. If we do not put multiple words in brackets () we apply the weighting to the word that represents the token embeddings associated to it. We can also specify the weight directly, e.g. (victorian)1.2. If you don’t want funky results, it’s probably a good idea to stay in the range of 0.6-1.5.
Compel also offers other tricks, that may be interesting, take a look here.
Let’s take a look at the result:
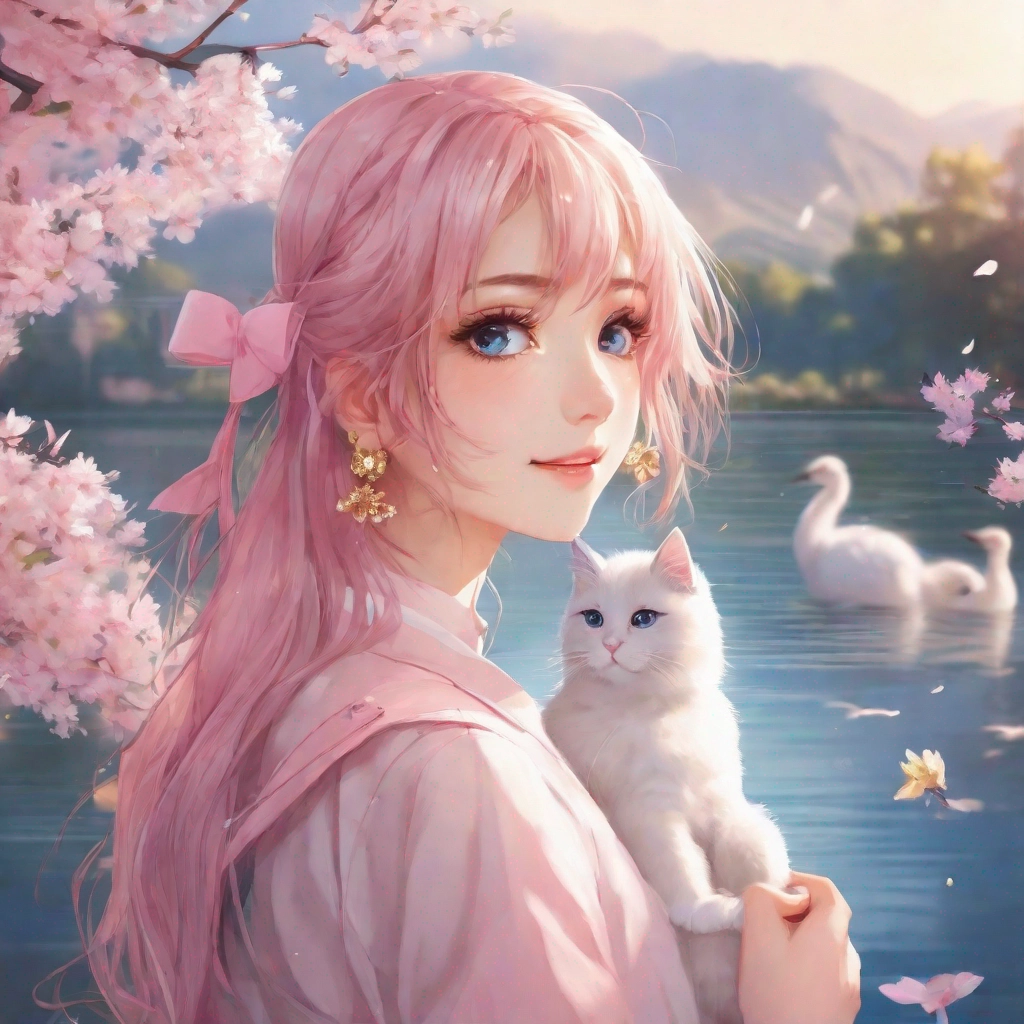
Great! Now we have weights in our Prompts. Now, how do we get extended Lengths in our Prompts without them being cut-off? Let’s go by this example:
from diffusers import DDIMScheduler, EulerDiscreteScheduler
base_pipeline.scheduler = DDIMScheduler.from_config(base_pipeline.scheduler.config)
c_height = 1024
c_width = 1024
c_steps = 40
c_seed = 95832
c_generator = torch.Generator(device="cuda").manual_seed(c_seed)
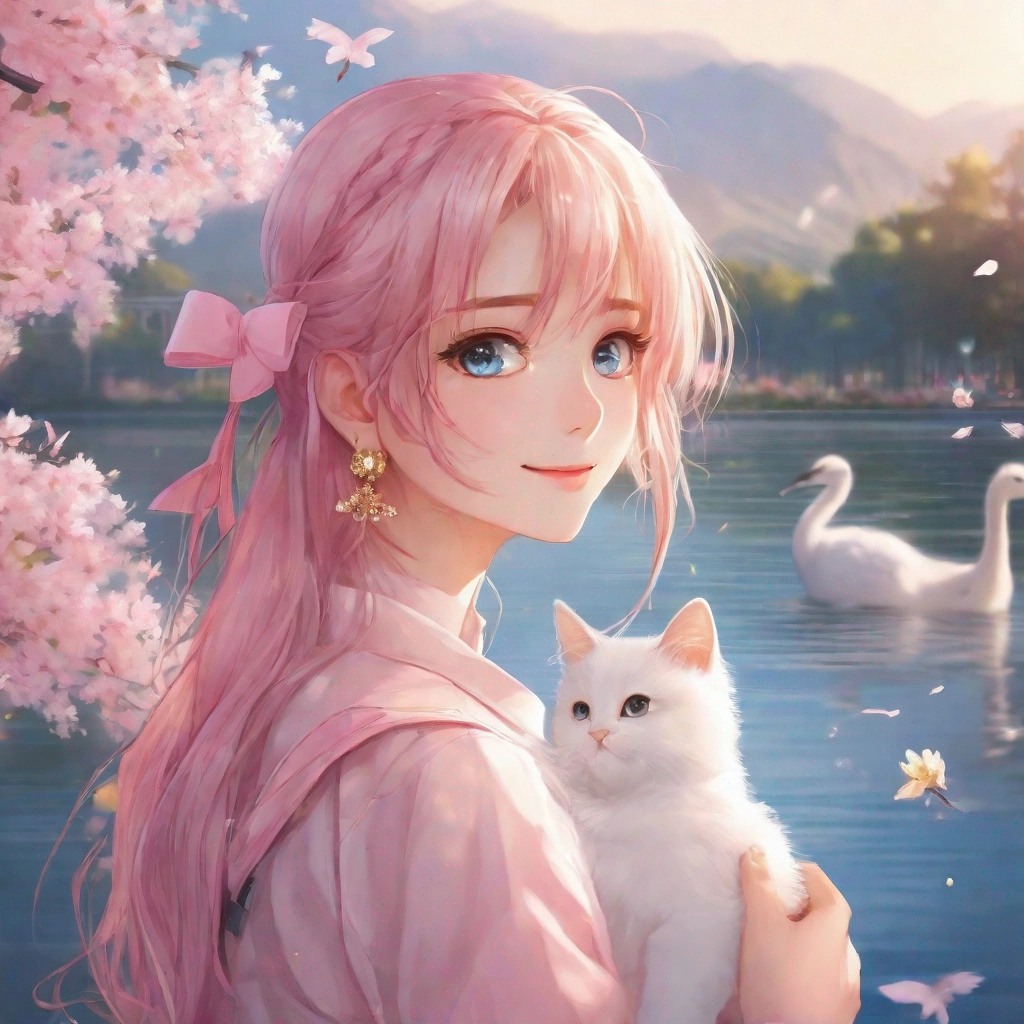
c_positive_prompt = "(Anime Portrait)1.2 of a young woman, pretty+ stunning+ blue eyes, soft face, long pink hair, bow hairclip, pink school uniform, high quality, hq, 4k, 8k, award-winning, happy white cat in her arms, dawn+, close-up+, (cherry blossoms)---, (wearing golden blossom earrings)+, (bokeh effect)-, cute, lake with (white cranes)++ in the background, butterflies--, reflections--"
c_negative_prompt = "Bad quality, artifacts, low quality, lowres, deformed+, malformed+, extra hands, extra limbs, bad eyes, ugly, lowres, washed out, poor quality"
compel = Compel(tokenizer=[base_pipeline.tokenizer, base_pipeline.tokenizer_2],
text_encoder=[base_pipeline.text_encoder, base_pipeline.text_encoder_2],
returned_embeddings_type=ReturnedEmbeddingsType.PENULTIMATE_HIDDEN_STATES_NON_NORMALIZED,
requires_pooled=[False, True],
truncate_long_prompts=False)
# Create prompt embeds and pooled prompt embeds
p_conditioning, p_pooled = compel(c_positive_prompt)
n_conditioning, n_pooled = compel(c_negative_prompt)
[p_conditioning, n_conditioning] = compel.pad_conditioning_tensors_to_same_length([p_conditioning, n_conditioning])
# generate image
image = base_pipeline(width=c_width,
height=c_height,
prompt_embeds=p_conditioning,
pooled_prompt_embeds=p_pooled,
negative_prompt_embeds=n_conditioning,
negative_pooled_prompt_embeds=n_pooled,
num_inference_steps=c_steps,
generator=c_generator).images[0]
disp(image)
## Reset to EulerDiscrete
from diffusers import EulerDiscreteScheduler
base_pipeline.scheduler = EulerDiscreteScheduler.from_config(base_pipeline.scheduler.config)
This example is handpicked with a different scheduler, so we first switch to the DDIMScheduler and change back to the EulerDiscreteScheduler. This has no effect on how we pad our embeddings. First we must specify truncate_long_prompts=False to ensure the prompts are not truncated. Now, we must make sure that the Tensors of the normal embeds have the same tensor dimensions, otherwise we would get an error. We simply pass them to the compel.pad_conditioning_tensors_to_same_length function with our positive and negative embeddings. Now, instead of the prompts being truncated, prompts that are longer than the max token length will be chunked and padded out to an integer multiple of the max token length. Let’s have a look:
Great. Now let’s compare the image without the truncate_long_prompts option set to False and without padding the Tensors to the same length:
from diffusers import DDIMScheduler, EulerDiscreteScheduler

base_pipeline.scheduler = DDIMScheduler.from_config(base_pipeline.scheduler.config)

c_height = 1024
c_width = 1024
c_steps = 40
c_seed = 95832
c_generator = torch.Generator(device="cuda").manual_seed(c_seed)
c_positive_prompt = "(Anime Portrait)1.2 of a young woman, pretty+ stunning+ blue eyes, soft face, long pink hair, bow hairclip, pink school uniform, high quality, hq, 4k, 8k, award-winning, happy white cat in her arms, dawn+, close-up+, (cherry blossoms)---, (wearing golden blossom earrings)+, (bokeh effect)-, cute, lake with (white cranes)++ in the background, butterflies--, reflections--"
c_negative_prompt = "Bad quality, artifacts, low quality, lowres, deformed+, malformed+, extra hands, extra limbs, bad eyes, ugly, lowres, washed out, poor quality"

compel = Compel(tokenizer=[base_pipeline.tokenizer, base_pipeline.tokenizer_2],
                text_encoder=[base_pipeline.text_encoder, base_pipeline.text_encoder_2],
                returned_embeddings_type=ReturnedEmbeddingsType.PENULTIMATE_HIDDEN_STATES_NON_NORMALIZED,
                requires_pooled=[False, True])

# Create prompt embeds and pooled prompt embeds
p_conditioning, p_pooled = compel(c_positive_prompt)
n_conditioning, n_pooled = compel(c_negative_prompt)

# generate image
image = base_pipeline(width=c_width,
            height=c_height,
            prompt_embeds=p_conditioning,
            pooled_prompt_embeds=p_pooled,
            negative_prompt_embeds=n_conditioning,
            negative_pooled_prompt_embeds=n_pooled,
            num_inference_steps=c_steps,
            generator=c_generator).images[0]

disp(image)

## Reset to EulerDiscrete
from diffusers import EulerDiscreteScheduler

base_pipeline.scheduler = EulerDiscreteScheduler.from_config(base_pipeline.scheduler.config)
As you can see, some Detail is lost.
Using the Refiner
As talked about previously, SDXL introduced an optional Refiner Model that adds some details that improve the perceived quality of the image. This step requires significantly higher amounts of VRAM, so it may be necessary to activate CPU offloading. Let’s go ahead by defining the refiner Pipeline:
# Refiner
refiner_pipe = DiffusionPipeline.from_pretrained(
    "stabilityai/stable-diffusion-xl-refiner-1.0",
    text_encoder_2=base_pipeline.text_encoder_2,
    vae=base_pipeline.vae,
    torch_dtype=torch.float16,
    scheduler=base_pipeline.scheduler,
    use_safetensors=True,
    variant="fp16",
)

refiner_pipe.enable_model_cpu_offload()
If you have higher VRAM, you should load the refiner_pipe into cuda instead of activating cpu offloading like so refiner_pipe.to("cuda", torch.float16). To save some GPU Memory, we can utilize the second text encoder, the vae and the scheduler from the base model.
Let’s go ahead and generate the image from our previous example:
seed = 123
steps = 50
width = 1024
height = 1024
positive_prompt = "Colorful Roaring Lion sitting on a victorian couch, flat icon, vector"
negative_prompt = "realistic, realism, photograph"
denoise_frac = 0.8 # 80% is done on base pipeline, the rest on refiner

generator = torch.Generator(device="cuda").manual_seed(seed)

latent = base_pipeline(width=width,
            height=height,
            prompt=positive_prompt,
            negative_prompt=negative_prompt,
            num_inference_steps=steps,
            generator=generator,
            output_type="latent",
            denoising_end=denoise_frac).images
image = refiner_pipe(prompt=positive_prompt,
                    negative_prompt=negative_prompt,
                    num_inference_steps=steps,
                    image=latent,
                    generator=generator,
                    denoising_start=denoise_frac).images[0]

disp(image)
We specify a ratio, at which the steps will be distributed among the pipelines. By setting a denoise_frac of 0.8 we define that 80% of the total steps should be done on the Base Pipeline and 20% of the total steps should be done on the refiner pipeline. We also set the output type of the base pipeline to latent that we can directly inject into the refiner pipeline. The denoising_end and denoising_start parameters define the points at which the pipelines start and stop the denoising process respectfully. Let’s take a look:
The left image is with the Refiner, and the right the previous image without the refiner. You can definitely spot some differences, for example at the eyes.
Additional Ressources
The Notebook of this tutorial can be found on Colab here. We also highly recommend checking out this Notebook as it gives a more thorough overview of this tutorial and technical details. We also created a Mini Playground with interactive Jupyter Widgets without Refinement and with Refinement.
We hope you enjoyed this Blog Post diving into the details of SDXL and learning how to generate Images with the diffusers library. We are excited to see some of your creations!