

Just as of recently, we were used to creating our own boxed logic and components for interacting with LLMs. The Team of Langchain has realized, that there are many common abstractions and patterns when building wrappers for LLMs in Application development. Thus they created LangChain, a powerful framework for building Applications with LLMs in a standarized and modular way. When you were used to using SDKs like the OpenAI library, LangChain may appear a bit intimidating. However, the principles of using LangChain are quite straightforward.
We have created this tutorial to give you a basic understanding how to use LangChain in your own Applications. At the end of this tutorial, you will have a fully functioning application, that you can use to chat with any Repository of your liking.
Installing dependencies
In this tutorial, we assume you use a virtual python environment like conda.
First let us create a new environment for this tutorial and activate it:
conda create -n langchain_repo_chat python==3.10
conda activate langchain_repo_chat
Now, let us install any necessary packages:
pip install openai langchain markdown gradio chroma GitPython chromadb tiktoken
Now we are good to go!
Setting up our project
Create a new folder with a python file called repo_chat.py:
mkdir neuraluma_tutorial
cd neuraluma_tutorial
touch repo_chat.py
Also create a .env file inside the neuraluma_tutorial folder. This file will include our OpenAI API Key.
touch .env
Now, head over to your OpenAI Account and grab or create a new API Key. If you don’t have an OpenAI Account yet, create one here.
Once you copied your API Key starting with sk- add it to the .env file:
echo "OPENAI_API_KEY=sk-..." > .env
Now we can continue with creating our little “git chat” application!
Import dependencies
Open repo_chat.py in your favorite Code Editor.
Let’s import the necessary dependencies:
import os
from functools import partial

from dotenv import load_dotenv, find_dotenv
_ = load_dotenv(find_dotenv()) # read local .env file for our API Keys
from langchain.chat_models import ChatOpenAI
from langchain.document_loaders import GitLoader
from langchain.text_splitter import (
    RecursiveCharacterTextSplitter,
    Language,
)
from langchain.embeddings import OpenAIEmbeddings
from langchain.vectorstores import Chroma
from langchain.chains import RetrievalQA
from langchain.memory import ConversationTokenBufferMemory
import gradio as gr
import markdown
from langchain.prompts import ChatPromptTemplate
Let’s go briefly over the langchain dependencies:
langchain.chat_models contains LLMs optimized for instructions (chat models). In our case, we use ChatOpenAI for using the gpt-3.5-turbo model (aka ChatGPT). There are also other models available, such as ChatAnthropic or ChatGooglePalm. We won’t cover other options in this tutorial, however, as you’ll see, it is quite easy to change from one provider to another. The documentation also gives you an overview of Chat Models.
langchain.memory contains different ways of storing the Chat History. Again, there are many different options to choose from, and depending on your usecase or preferences another memory may be better for you. We have decided to use ConversationTokenBufferMemory since it stores history up to a specified token count. This is really useful, if you want to make the API Inferences more predictable as for example ConversationBufferWindowMemory may be used to store the last k tokens, but has the shortcoming that a message may be longer than expected or shorter. The documentation also offers you more insight on different types of memory, such as memory directly tied to vector databases.
langchain.prompts has many utilities that contain LLM and Chat Templates, as well as Output Parsers. Prompt Templates are very useful, as they give you the option to create a predefined prompt with the ability to add variables that may be inserted by LangChain. In our case we use ChatPromptTemplate which contains the variables context (files from the git repo) and the user’s question (input). Here you can find out more.
langchain.chains are a core concept, as suggested by the name. They enable you to create different pipelines for input and output. Allowing you to combine multiple components together, even other chains, to create an Application. You can create your own or use presets based on your usecase. We will use the RetrievalQA chain for question answering based on the context we inject from our repo files. See more here.
langchain.document_loaders provides utilities for loading different type of files. This may be text documents, Notion files, Google Drive Documents, or like in our case with GitLoader, files from a git repository. You can read more about them here.
langchain.text_splitter help us split long pieces of texts into chunks, so they can be partially injected and searched in our vector store. We will use the RecursiveCharacterTextSplitter with Language to create optimized text splits based on the programming languages we parse. Look here for more information.
With langchain.embeddings we can convert our text data from our files to vector representations (embeddings). This is necessary, to search and inject our text data to our vector store and LLM, as they natively work with numeric representations that correlate to semantic and word meaning under the hood. As we work with OpenAI, we will use OpenAIEmbeddings. You can find other Embeddings here.
Last but not least, we will use a vector store with langchain.vectorstores. In our case we use Chroma. It will be used, to store our embeddings from our Repo files, that we can query using a similarity search within the user’s prompt. Again there are many different options available, such as Redis or ElasticSearch.
Defining Parameters for GitLoader and LLM
Now let us define some parameters. Namely, the repository url, the local path of the repository and the llm which we will use.
repo_url = "https://github.com/ganlanyuan/tiny-slider"
local_path = os.getcwd() + '/repo'
llm = ChatOpenAI(model="gpt-3.5-turbo", temperature=0)
In our example, we use the Open Source Tiny Slider library which is used in Web Development to create Sliders (for example image carousels).
Notably, we specify the Chat Model to be gpt-3.5-turbo and set a low temperature of 0 to reduce hallucinations.
Loading and splitting our Repository
Now we can start loading our documents from the Git Repostiory and split them into chunks, so they can easily be stored and queried from our vector store to be injected as context for our LLM.
For this, we will create some helper functions:
def get_loader(local_path, repo_url, branch = 'master', has_file_ext = ['.md', '.js', '.html'], ignore_paths = ['dist/']):
    """
    Helper function to create a Loader to load the repo

    Args:
        local_path (str): Path to the local repo
        repo_url (str): URL of the repo to clone from
        branch (str): Branch of the repo to checkout
        has_file_ext (list): ist of file extensions to load
        ignore_paths (list): List of paths to ignore

    Returns:
        GitLoader Object
    """

    # If the path exists, the GitLoader will throw an Error when trying to clone
    if os.path.exists(local_path):
        repo_url = None

    file_filter_functions = []

    def not_in_ignore_paths(file_path, ignore_paths):
        return all(file_path.find(path) == -1 for path in ignore_paths)

    def has_allowed_extension(file_path, extensions):
        return any(file_path.endswith(ext) for ext in extensions)

    if len(ignore_paths):
        file_filter_functions.append(partial(not_in_ignore_paths, ignore_paths=ignore_paths))

    if len(has_file_ext):
        file_filter_functions.append(partial(has_allowed_extension, extensions=has_file_ext))

    def file_filter_function(file_path):
        return all(func(file_path) for func in file_filter_functions)

    return GitLoader(repo_path=local_path, clone_url=repo_url, branch=branch, file_filter=file_filter_function)
This helper function help us create a GitLoader object with our desired remote repository url. We also give it the local path and branch, as well as file extensions which we want to include and paths to ignore (in this example most notably the dist folder).
def split_docs(docs):
    """
    Helper function to split the docs into chunks by supported languages.

    Args:
        docs (list): List of documents to split

    Returns:
        list of documents
    """

    js_splitter = RecursiveCharacterTextSplitter.from_language(
        language=Language.JS, chunk_size=1024, chunk_overlap=0
    )
    html_splitter = RecursiveCharacterTextSplitter.from_language(
        language=Language.HTML, chunk_size=1024, chunk_overlap=0
    )
    markdown_splitter = RecursiveCharacterTextSplitter.from_language(
        language=Language.MARKDOWN, chunk_size=1024, chunk_overlap=0
    )

    # Only retrieve the text from the documents
    text_docs = [doc.page_content for doc in docs]

    js, html, markdown = js_splitter.create_documents(texts=text_docs), html_splitter.create_documents(texts=text_docs), markdown_splitter.create_documents(texts=text_docs)

    # merge the docs to List
    return js + html + markdown
With this function, we can use specific instances of the RecursiveCharacterTextSplitter to properly split based on the input language. Here, we used js, html and markdown and set a chunk_size of 1024. Adjust this, depending how large you want the chunks to be. The larger they are, the more context they contain, but potentially also increase your API costs.
Now let us retrieve the GitLoader, load all desired documents and split them into chunks:
loader = get_loader(local_path, repo_url)
docs = loader.load()
splitted_docs = split_docs(docs)
Create Embeddings and store them in our Vector Store
Let’s create our Embeddings with OpenAIEmbeddings and store them in our Vector Store Chroma:
embeddings = OpenAIEmbeddings()
vectorstore = Chroma.from_documents(documents=splitted_docs, embedding=embeddings)
Please note, if you plan to use this code in production and run this code many times to store the embeddings locally or remotely to avoid unnecessary API costs.
Additionally, let us define our retriever for the Vector Store which defines from vectorstore:
vector_retriever = vectorstore.as_retriever(search_kwargs={"k": 4})
You can adjust the options, such as search_kwargs k to your liking. In this example k is set to 4 which means that the 4 most similar documents will be loaded from the user’s prompt.
Create memory
Technically, it is not necessary to have a long lasting memory if we just want to ask simple questions about our repository. However, in a Chat Application, it would be confusing if the chat context wasn’t kept in the conversation. This enables us, to ask follow up questions without putting everything back into one prompt ourselves.
Let’s create a ConversationTokenBufferMemory with a max token limit of 512.
memory = ConversationTokenBufferMemory(llm=llm, max_token_limit=512)
Prompt Template and Chain Creation
To improve the performance of our chain, let us create a custom ChatPromptTemplate. Technically, we could use the default one provided in RetrievalQA, but we figured small adjustments improve the performance when referring the repository as the library or vice versa:
prompt_template = ChatPromptTemplate.from_template(
    """
    Your task is to assist with questions from a code repository. \
    The Repository is a library called tiny slider. \
    Use the following pieces of context to answer the question at the end. \
    The context are snippets of files from the repository \
    When answering with code snippets, make sure to wrap them in the correct syntax using markdown backticks. \
    If you don't know the answer, just say that you don't know, don't try to make up an answer.

    {context}

    Question: {question}
    Helpful Answer:
    """
)
The Template it an adaption from the default of RetrievalQA. It adds some additional context and tells the LLM to use the correct markdown syntax when referencing code blocks. Important are the template variables context and question. The former is the injected context from the loaded documents, that will be loaded from our vector store. The latter is the users prompt. “Helpful Answer:” is trying to guide the LLM in generating a helpful answer to the prompt.
Now let’s define the chain we use for inferring the users prompt:
chain = RetrievalQA.from_llm(
    llm=llm,
    memory=memory,
    retriever=vector_retriever,
    prompt=prompt_template,
)
Create a simple UI to interact with our App
Now, let us quickly define a UI using gradio which we can utilize to chat with the LLM about our repository:
# This list will keep track of the conversation history for the ui
conversation_history = []

def format_input(user, user_input):
    return f"## {user}:\n\n {user_input}\n\n"

def handle_submit(input_text):
    # Add user input to conversation history
    conversation_history.append({'type': 'User', 'text': input_text})

    # Get our result from the chain and append to history:
    result = chain.run(input_text)
    conversation_history.append({'type': 'AI', 'text': f"{result}\n\n"})

    # Construct markdown text from conversation_history
    md_text = ""
    for entry in conversation_history:
        md_text += format_input(entry['type'], entry['text'])

    # Convert markdown to HTML
    html_conversation = markdown.markdown(md_text)

    # Return the conversation history as HTML
    return html_conversation

# Define the Gradio interface
iface = gr.Interface(
    fn=handle_submit,                                         # Function to be called on user input
    inputs=gr.components.Textbox(lines=2),                    # Text input
    outputs=gr.components.HTML(),                             # Output type set to HTML
    title="Chat with your Repo",                              # Title of the web page
    description="Enter your question and get a response.",    # Description
    allow_flagging="never"                                    # Disable flagging
)

# Launch the Gradio app
iface.launch()
This will create a simple UI that simply formats the User Inputs and LLM outputs with a textbox for in and output. Feel free to create your own implementation.
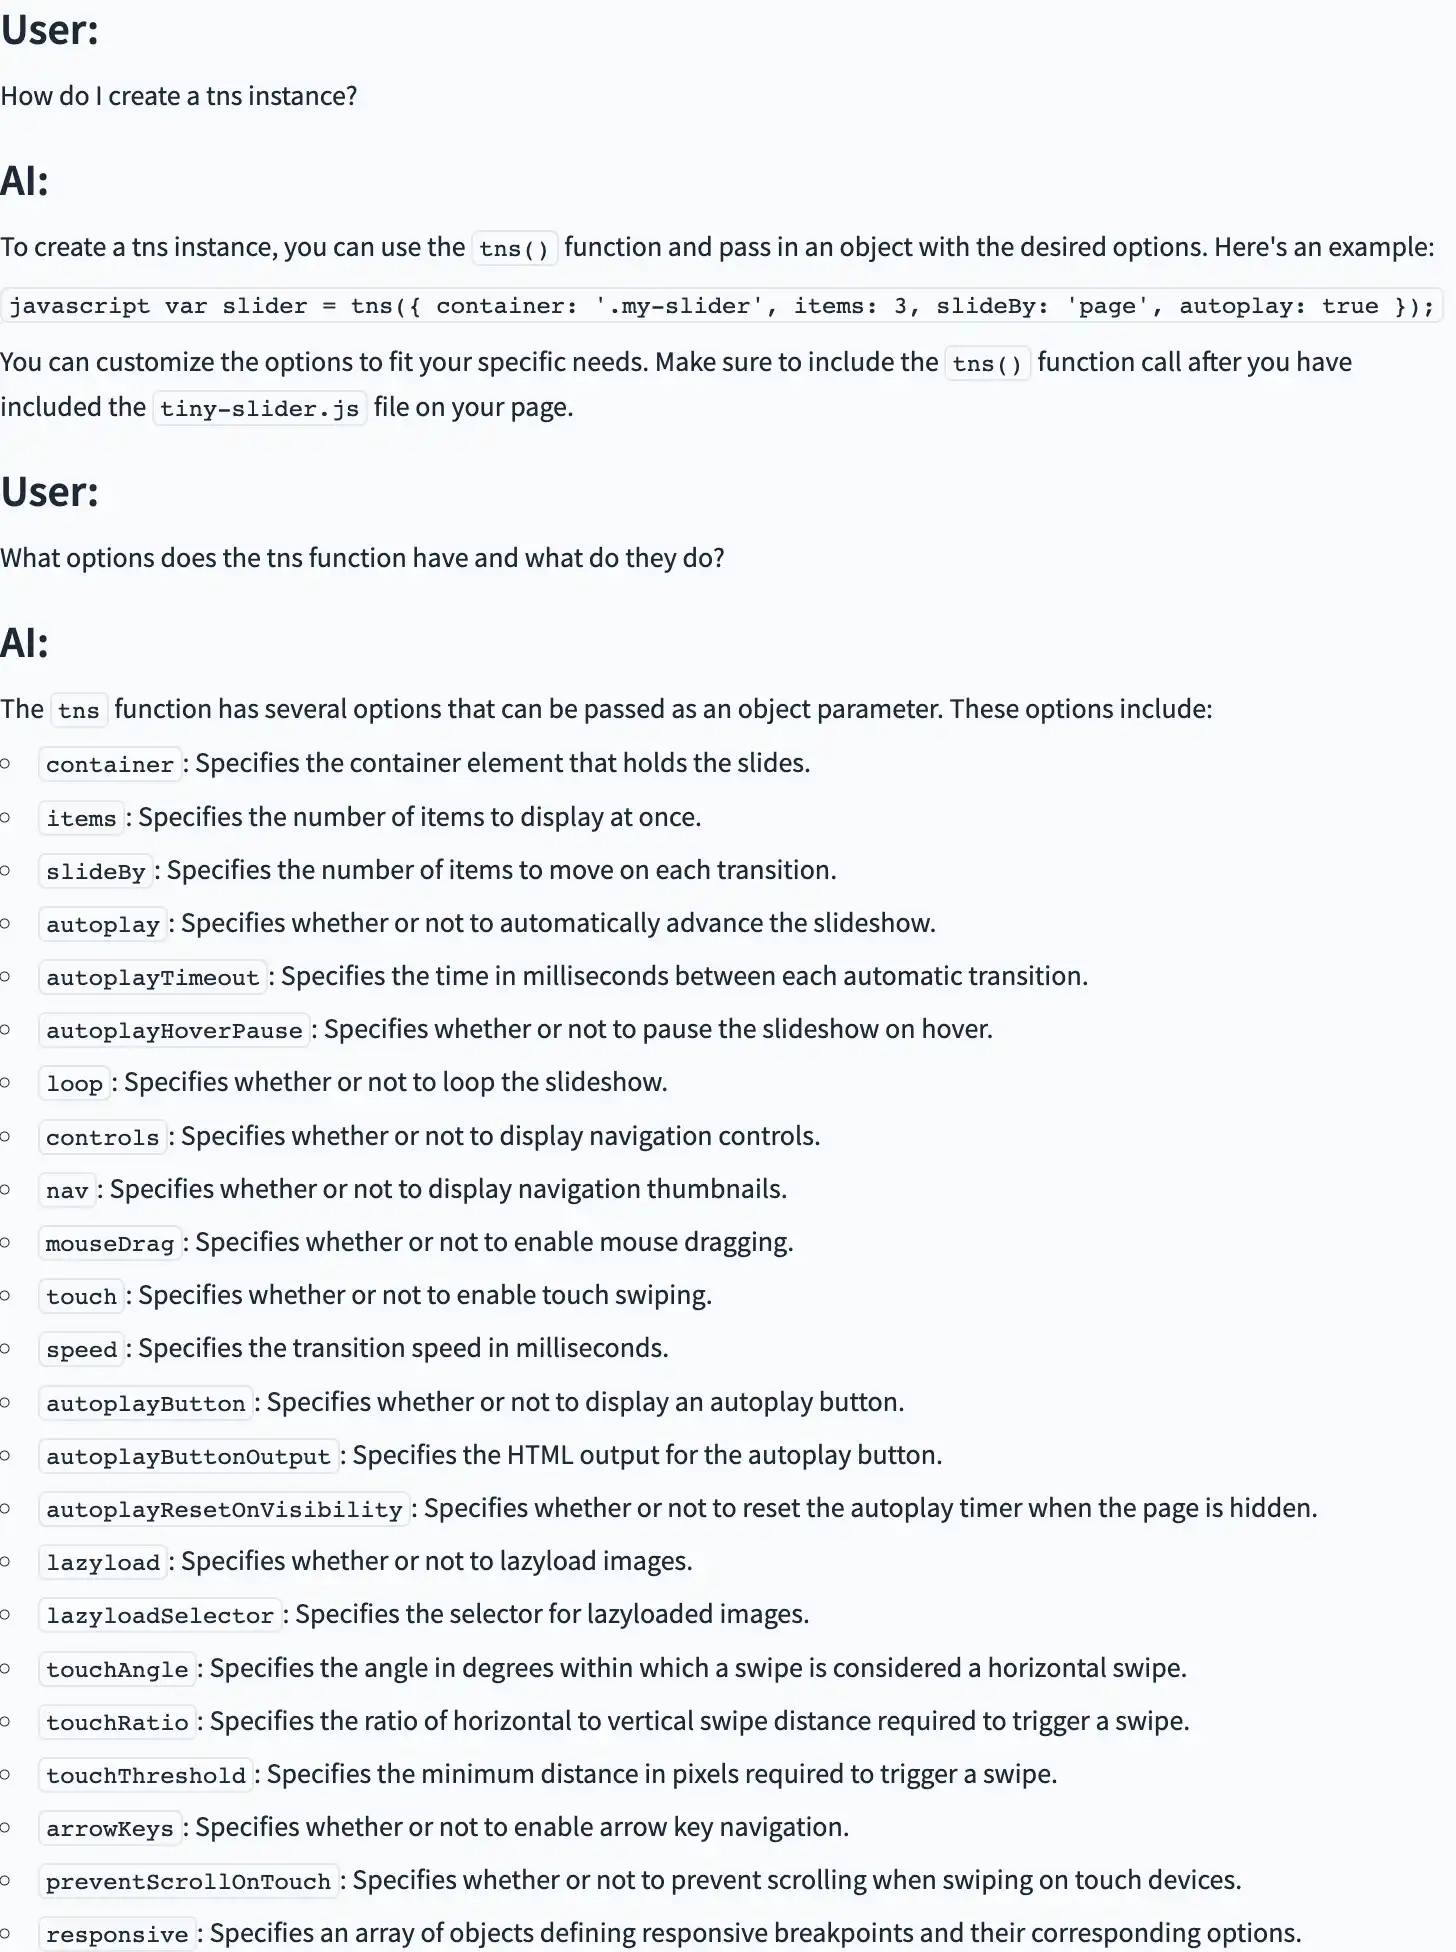
Here is an example asking some technical questions about tinyslider:
Thanks for reading! If you prefer Jupyter notebooks or want to just download and run the python file of this tutorial look here!

