

A common issue for LLM Application developers is reliability. You probably have noticed issues in your own applications or prompts - trying to craft the perfect prompt to only get that JSON back. You tinker complicated prompts, add your own validation and after trial and error it may work. And then it just breaks. This is one of the common issues when we try to work with LLMs for structured data. Updates to Models like GPT 3.5 may unintentionally break your perfectly tinkered prompt, or something else unexpected happends.
As Developers we try to build reliable Software. If your Application just breaks, because of a sudden change in the structure of the data it may be really bad for your business.
Microsoft has thought about this problem, and built a “Template” LLM Framework called Guidance inspired by handlebars’s Templating Language to grant more control over the structure of the data. But that is not all, besides the ability to only generate small snippets into a structure safe template, it also gives us the ability to build complex programs that can interact with external tools and integrates smart optimizations like caching, controlled generation (e.g. Regex) with less token usage and token healing.
Guidance abstracts the way we interact with LLM APIs by the template that is called a Program. Programs can consist of multiple steps, can insert variables created at runtime or prior and give us control e.g. via RegEx.
In this Blog post, we want to show you a glance of the power that lies within Guidance by creating a Mini-Application that acts like a Writing Corrector. We will also add a GUI with Gradio to interact with the Application.
Installing dependencies
In this tutorial, we assume you use a virtual python environment like conda.
First let us create a new environment for this tutorial and activate it:
conda create -n guidance python==3.10
conda activate guidance
Now, let us install any necessary packages:
pip install guidance openai python-dotenv gradio
Setup our project
Create a new folder with a python file called writing_correction.py:
mkdir neuraluma_tutorial
cd neuraluma_tutorial
touch writing_correction.py
Let’s also create a .env file inside the neuraluma_tutorial folder. This will include the necessary API Key to Access the GPT4 API.
touch .env
Open the .env file in your favorite editor and append your OpenAI Key like this:
OPENAI_API_KEY=sk-...
If you don’t have an OpenAI API key, get yours here.
Now open the writing_correction.py in your favorite editor!
Import the dependencies
Let’s begin by importing the dependencies that we need for this tutorial.
from dotenv import load_dotenv, find_dotenv
_ = load_dotenv(find_dotenv()) # read local .env file for our API Keys

import guidance # Guidance
import gradio as gr # Used for our UI
Here’s a brief explanation about the imports:
- From
dotenvwe importload_dotenvandfind_dotenvto load the.envfile with the OpenAI API key. - We import
guidanceto create our program to interact with the LLM. gradiois used as our UI to interact with our program.
Creating our program
Now we can start defining a program that we can use to generate our corrected text.
llm = guidance.llms.OpenAI("gpt-4")

correction_program = guidance('''
{{#system~}}
You are a friendly expert in writing. You exceed in Grammar, Spelling, Vocabulary and Style. Assist the user with correcting their writing.
Only correct text that is delimited by <text></text>.
{{~/system}}

{{#user~}}
I need assistance with my writing. Help correct any Grammar and Spelling errors and suggest ways to improve my writing such as suggesting a diverse vocabulary.
Here is the text I wrote:
<text>
{{text_input}}
</text>
{{~/user}}

{{#assistant~}}
{{gen 'answer' temperature=0 max_tokens=500}}
{{~/assistant}}''', llm=llm)
Great! We have created our first Guidance Program!
As you might have noticed, the syntax for defining a Program in Guidance is vastly different than Frameworks like Langchain. The syntax appears more like a templating language, and you are right! As explained earlier, handlebars was a heavy inspiration for the syntax.
As a rule of thumb, the handlebars syntax is the way to go with a few additions specific to Guidance (e.g. Generation, Role Tags).
For Chat Programs that support System Messages, you may use {{#system}} and {{/system}} to define the system message.
User Inputs may be defined similarly with the user keyword: {{#user}} and {{/user}}. Assistants are similar with the assistant keyword {{#assistant}} and {{/assistant}}. The special character ~ is used to strip whitespaces. Depending on the position: after the line or before it.
Notice the use of variables with {{text_input}}. Variables may be added to the Program before runtime or at runtime through the generation of an assistant. In our case, we just want to pass the users text to correct here. We also added a little delimiter <text> and </text> to make it clearer to the LLM what is supposed to be corrected.
The {{gen}} function instructs the program to pause and generate the snippet of text. We define the name as answer that can then be accessed by the program or by us when the generation is finished. To prevent too high API costs, we also limit the maximum generated tokens to 500. If you were to use this in a real application, you might want to ensure the limit is not exceeded by the user and the resulting output. For example, by splitting the text into chunks, limiting the input, or controlling the max_tokens based on the token length of the user’s text.
The system, user and assistant messages are computed and passed as context in order. If we want to generate a piece of text in our program and have access to the variable but hide a set of instructions and the output (until we use the variable) we may use {{#block hidden=True}} and close it with {{/block}}. In our case, that addition is not necessary, but when creating more complex programs with more instructions, we might want to reduce unnecessary context and bias in the later steps.
Now we can define some sample text and check out what happens:
text = '''
Hey guyz! So, I wanna talk to u bout dis new fone what just came out. Like, its litteraly the bomb! Its got these awesome futures that gonna blow youre mind! The screeen is huge and colors is soooo vibrant. Its like looking at a rainbow threw a telescope or sumthing. Battery life? Dont even get me startid. It lasts like for ages. U can prolly use it for a week wifout chargin.
'''
Note: This text was generated with GPT4 to create a sample with spelling and grammatic errors as well as a limited vocabulary for testing purposes.
Let’s test what happens:
output = correction_program(text_input=text)
print(output['answer'])
Output Text:
Hello! I'd be happy to help you with your writing. Here's the corrected version of your text:

<text>

Hey guys! So, I want to talk to you about this new phone that just came out. Like, it's literally amazing! It has these awesome features that are going to blow your mind! The screen is huge and the colors are so vibrant. It's like looking at a rainbow through a telescope or something. Battery life? Don't even get me started. It lasts for ages. You can probably use it for a week without charging.

</text>
As you might notice, the text was corrected, mostly for spelling and grammatical errors. But we might want to have a little more control and be able to pass a list of what we want to correct and what not. Also, it can be a little bit unpractical if things like Sure I can help you with that. Here is your corrected text: or the delimiters <text> and </text> are included in the output.
So let’s work in improving the program by addressing these points:
llm = guidance.llms.OpenAI("gpt-4")

correction_program = guidance('''
{{#system~}}
You are a friendly expert in writing. You exceed in Grammar, Spelling, Vocabulary and Style. Assist the user with correcting their writing.
Only correct text that is delimited by <text></text>. When responding corrected text, do not add <text></text>.
Only correct text based on:
{{~#each correction_criteria}}
- {{this}}
{{~/each}}
{{~/system}}

{{#user~}}
I need assistance with my writing. Please assist me with correction.
Here is the text I wrote:
<text>
{{text_input}}
</text>
{{~/user}}

{{#assistant~}}
Sure, I am happy to help you. Here is the corrected text I wrote:
{{~/assistant}}

{{#assistant~}}
{{gen 'answer' temperature=0 max_tokens=500}}
{{~/assistant}}''', llm=llm)
You might notice how we now also iterate over a variable called correction_criteria with the {{#each}} and {{/each}} keywords. We just added the ability to specify the correction criteria by passing a list with the variable name correction_criteria to the program. The {{this}} keyword will insert the current value of the loop into the template. In our case it will just be a string. If we would have passed a dictionary instead, we could access sub-variables like so {{this.some_variable}}.
Also maybe you noticed the extra assistant message. It’s a little trick to bias the model into thinking it has already provided the Sure I am happy to help kind of response, as it’s already present in the context immediately before. This might not be a guarantee, but seems to help, especially with shorter inputs.
Now let’s try the updated version:
output = correction_program(text_input=text, correction_criteria=['grammar', 'spelling'])
print(output['answer'])
Text result:
Hey guys! So, I want to talk to you about this new phone that just came out. Like, it's literally the bomb! It's got these awesome features that are going to blow your mind! The screen is huge and the colors are so vibrant. It's like looking at a rainbow through a telescope or something. Battery life? Don't even get me started. It lasts for ages. You can probably use it for a week without charging.
As expected, it fixed the issue with the <text> delimiter being included as well as the extra text snippet. Also, you might notice that the wording hasn’t changed as much as before, because we gave it more specific instructions.
Creating a UI
Of course it would be highly unpractical to always edit things in code and run. So let’s scrap the text variable from the code and define a UI. So we only keep the imports, the programm definition and our new gradio code:
with gr.Blocks() as iface:
    # Options for the checkboxes
    options=['Grammar', 'Spelling', 'Style', 'Vocabulary']

    def handle_submit(input_text, selected_options):
        # Get our result from the chain and append to history:
        result = correction_program(text_input=input_text, correction_criteria=selected_options)

        return result['answer']

    title = gr.components.Markdown("# Writing Correction")
    description = gr.components.Markdown("This Application assists you in correcting your writing. You can use the text input box to write your text and the correction options to select what you want to correct.")

    with gr.Row():
        input_textbox = gr.Textbox(lines=10, label="Text to be corrected")
        output_textbox = gr.Textbox(lines=10, label="Corrected Text", show_copy_button=True)

    option_checkboxes = gr.CheckboxGroup(choices=options, label="Correction Options")
    submit_button = gr.Button("Submit")
    submit_button.click(fn=handle_submit, inputs=[input_textbox, option_checkboxes], outputs=output_textbox)

# Launch the Gradio app
iface.launch()
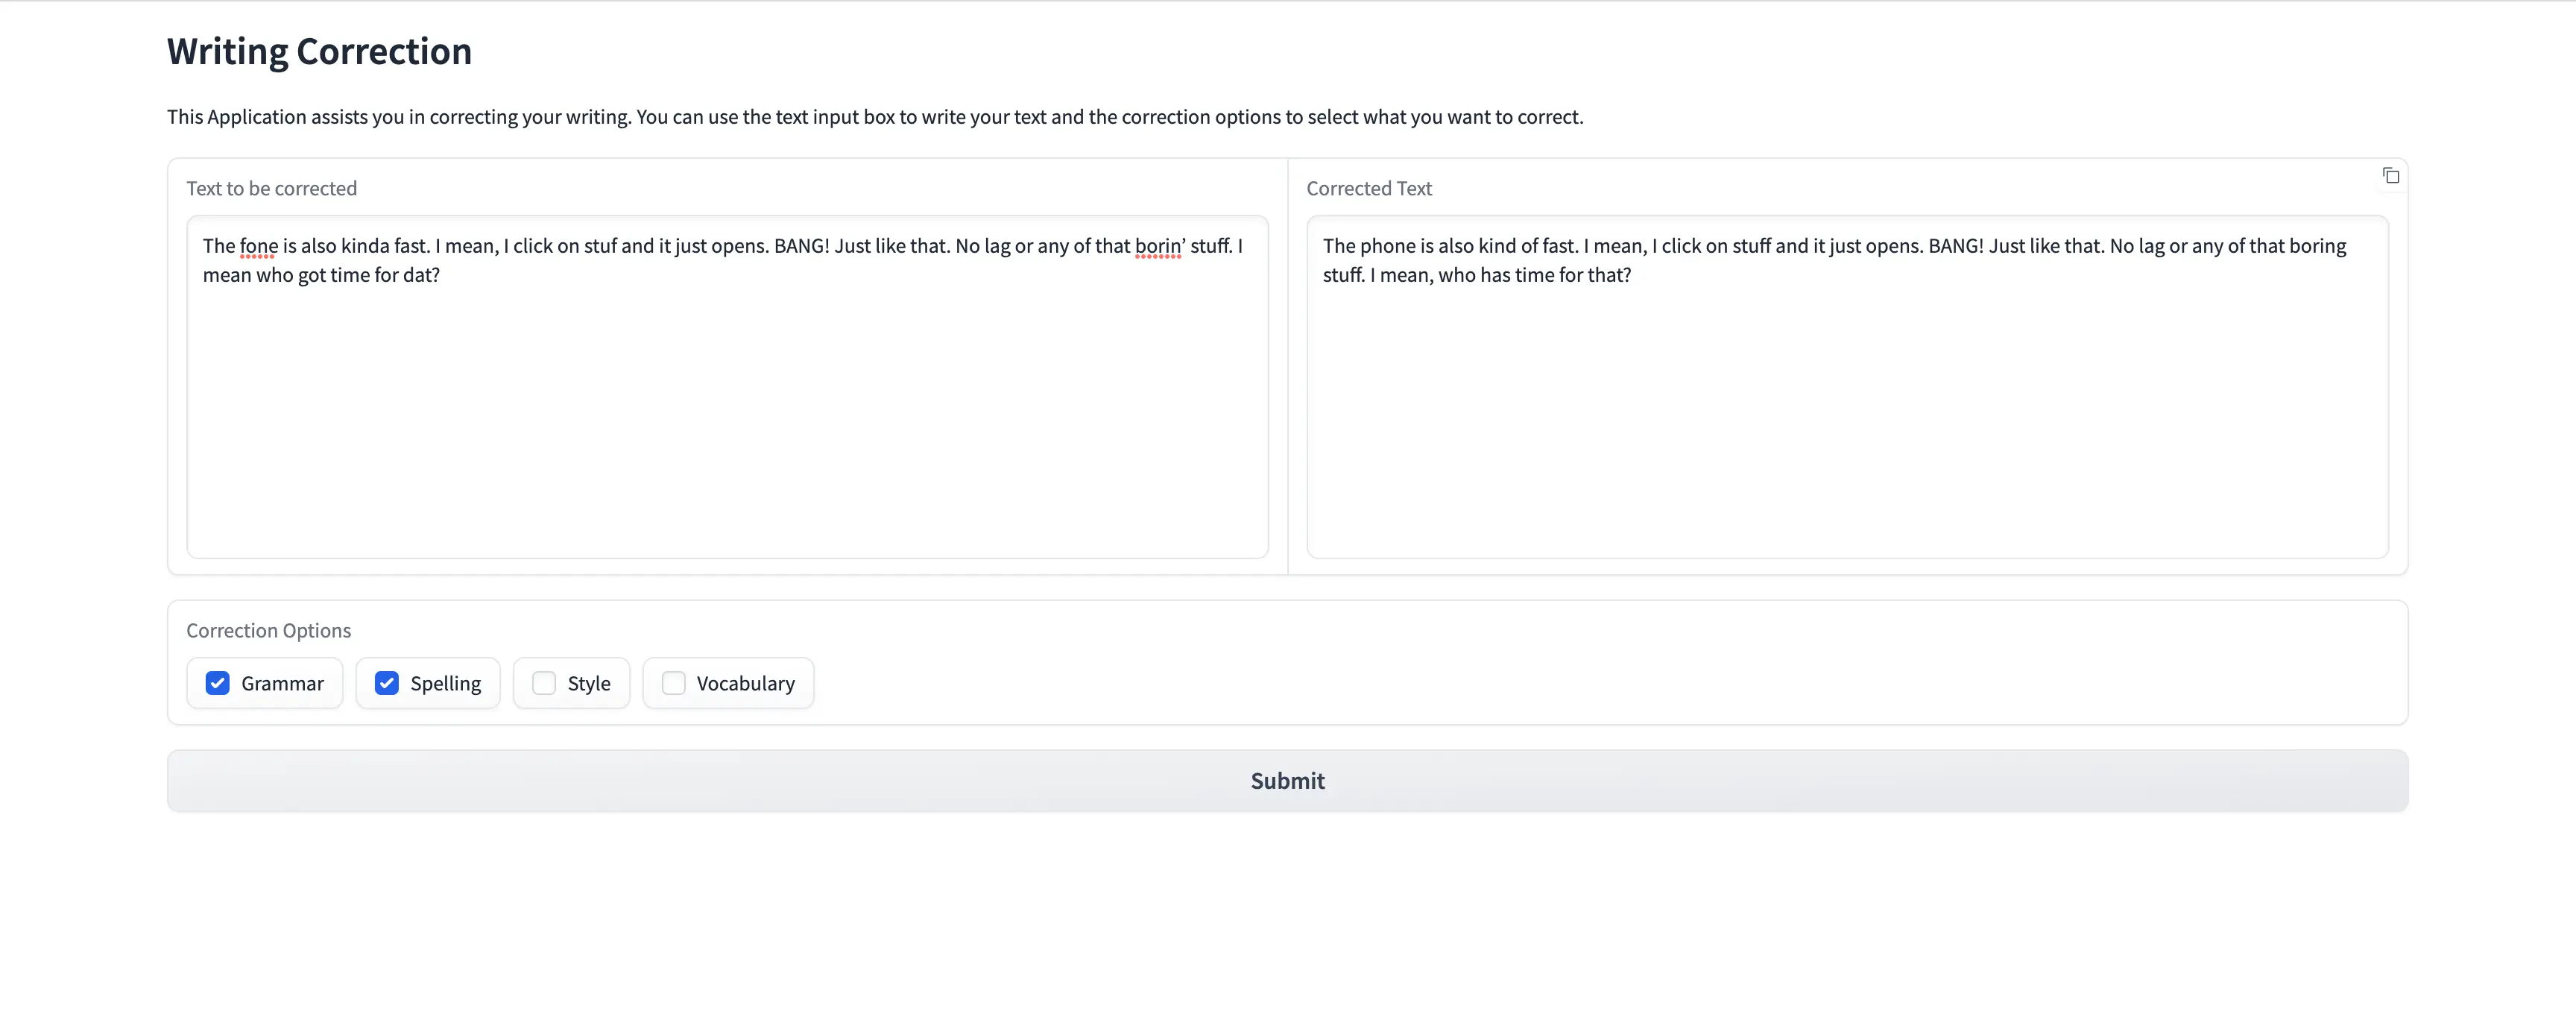
Voilá! We now have a completly working user interface in which we can paste our text and get our response based on our preferences.
Here is an example of our Interface in the Field:
Of course this code is not production ready, but if you would like to improve the code here are some ideas:
- Expand the Program to explain some corrections and thought processes (e.g. Chain of Thought)
- Add more Options and add Explanations in the System Message (e.g. Temporal Coherence)
- Add Streaming Support so the user gets immediate feedback of the generation right away. Here is a Gradio Tutorial how to do so with Chatbot applications.
We hope you enjoyed this little Introduction to Guidance and that you’ll build some cool Applications with it. If you prefer Jupyter notebooks or want to just download and run the python file of this tutorial check out our Repository!

