

Creating Text-Audio Datasets is essential when building Machine-Learning Based Applications. Datasets pose a foundation for a variety of Applications, such as building a voice cloning tool that can reproduce an accurate intonation of a person’s voice, to an application that allows user’s to query and navigate audio conversations.
Whisper is a popular Open-Source Machine Learning Model to transcribe Speech Audio, alternatively to other popular propiertary APIs like Assembly AI’s Conformer Model. In this Tutorial, we want to show you, how you might create your own Audio-Text Dataset locally using Huggingface’s Transformers Library and using an adapted, faster version in JAX by Sanchit Gandhi.
We also want to introduce our experimental library called NeuraLumaWhisper that might serve as a bootstrap of your Efforts for building an appropiate Dataset quicker using a handy CLI / WebUI.
Setting up a virtual environment
We recommend to install Miniconda for managing your virtual environments. In this tutorial, we assume you do so, but feel free to change up this step based on your prefered environment!
First we will create a fresh environment:
conda create -n whisperTutorial python==3.10
conda activate whisperTutorial
Setting up our project
Create a directory of your choice, in our case we will name it WhisperTutorial:
mkdir WhisperTutorial
cd WhisperTutorial
Before we can get started, let’s install the necessary package notebook and ipykernel so we can edit our Notebook in the Browser. We also need the transformers, pytorch and datasets library. Let’s install them all together:
pip install ipykernel notebook transformers torch torchvision torchaudio datasets "datasets[audio]"
Additionally, we also use ffmpeg to interact with Audio Files, install it via conda like so:
conda install ffmpeg -c conda-forge
Let’s open the jupyter server by entering the command:
jupyter notebook
Now let’s create a new file by clicking File and New then Notebook in the header context menu.
Select the kernel Python 3 (ipykernel)
Feel free to rename the notebook to tutorial.ipynb.
Using Whisper with Transformer Pipelines
Huggingface Pipelines make it really easy to use Whisper. Here is how we define our Whisper Pipeline:
from transformers import pipeline

whisper_pipeline = pipeline(model="openai/whisper-large-v2")
You may also choose other checkpoints. Here is an overview from OpenAI:
| Model Name | Parameters | English-only | Multilingual |
|---|---|---|---|
| openai/whisper-tiny | 39 M | ✓ | ✓ |
| openai/whisper-base | 74 M | ✓ | ✓ |
| openai/whisper-small | 244 M | ✓ | ✓ |
| openai/whisper-medium | 769 M | ✓ | ✓ |
| openai/whisper-large | 1550 M | x | ✓ |
| openai/whisper-large-v2 | 1550 M | x | ✓ |
Let’s get some samples from Mozilla’s common_voice_11_0 dataset. Notice how we use the option for streaming to prevent downloading the whole dataset. Using this option is not necessary, but avoids downloading the whole dataset:
from datasets import load_dataset

audio_dataset = load_dataset("mozilla-foundation/common_voice_11_0", "en", split="test", streaming=True)
audio_data_samples = audio_dataset.take(10)
As transcribing the whole dataset might take very long we have decided to just load the first 10.
Let’s use those to transcribe them with the whisper_pipeline:
transcriptions = [whisper_pipeline(sample["audio"]) for sample in audio_data_samples]
Great! Now we got some transcriptions. Let’s have a look:
print(transcriptions)
That outputs:
[{'text': ' Joe Keaton disapproved of films and Buster also had reservations about the medium.'}, {'text': ' Should be alright.'}, {'text': ' Six.'}, {'text': ' All is well that ends well.'}, {'text': ' It is a busy market town that serves a large surrounded area'}, {'text': ' The team had Olympic champion Carolina Marin in the squad for the season.'}, {'text': ' Do you mean it?'}, {'text': ' The new patch is less invasive than the old one, but still causes regression.'}, {'text': ' How is Mozilla going to handle ambiguities like Q and Q?'}, {'text': ' Wish you the same happiness, bhakti.'}]
Great! Let’s go a step further and let’s use our transcriptions and audio files to build a new dataset.
from datasets import Dataset, Audio

new_dataset = Dataset.from_dict({
    "audio": [(sample["audio"]) for sample in audio_data_samples],
    "transcription": [transcription["text"] for transcription in transcriptions]
}).cast_column("audio", Audio())
Let’s have a look at the Dataset:
print(new_dataset)
print(new_dataset.features)
That outputs:
Dataset({
    features: ['audio', 'transcription'],
    num_rows: 10
})
{'audio': Audio(sampling_rate=None, mono=True, decode=True, id=None), 'transcription': Value(dtype='string', id=None)}
We can now go ahead and save it to disk or push it to the hub. For visualization we go ahead and push it to the HuggingFace Hub and inspect it using the Dataset Viewer. Before we can do that, we must make sure to:
- Have a HuggingFace Account, if not we can create one here
- Obtain a Huggingface Token, if you don’t have one, get one here
Also we need to authenticate using the huggingface-cli. Authenticate with your token via:
huggingface-cli login
Pushing to the hub is quite easy. First you have to create a new Dataset here.
Make sure to set it to public, if you wish to inspect the dataset with the Dataset Viewer. In our example we just call it testset.
new_dataset.push_to_hub("myuser/testset", split="example")
Replace myuser with your huggingface username/organization. Defining a split is not necessary, but an option to seperate your dataset in different splits, very useful when you want to start actual training with your data.
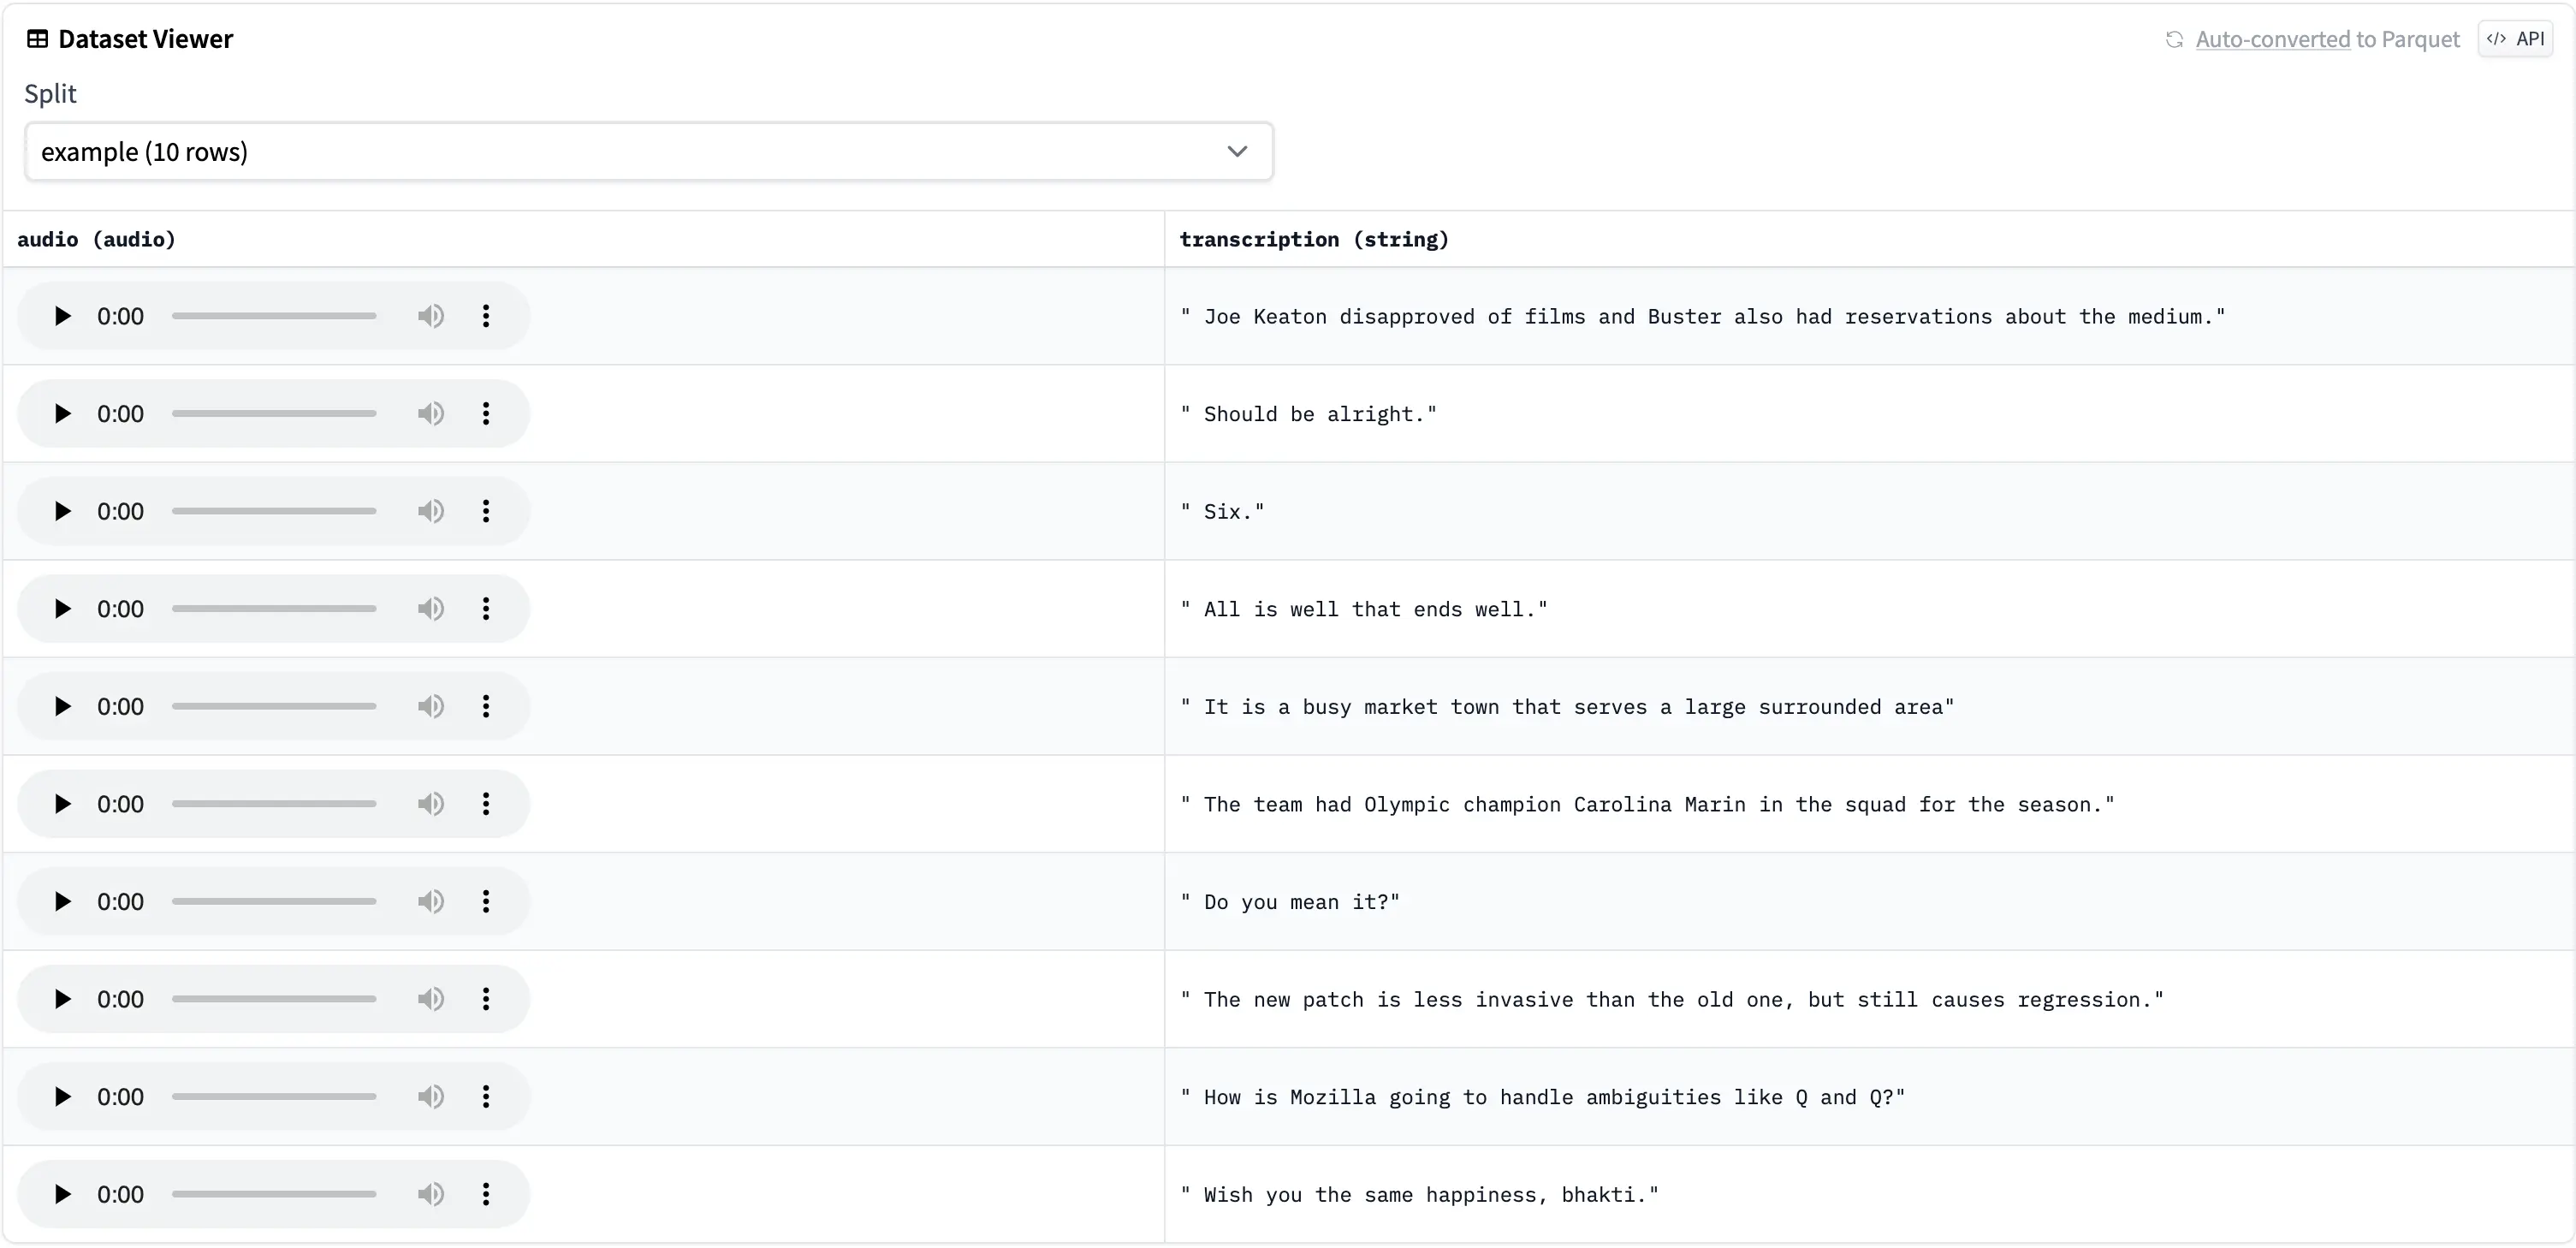
Great! Now we can easily access the Dataset Viewer by going here and clicking on your latest Dataset and finally clicking on Go to Dataset Viewer.
This is how our example looks like:
Using Whisper JAX
As you saw, the inference with the transformers library is quite easy. However, inference Speeds can be greatly improved by using Whisper JAX by Sanchit Gandhi.
According to their Benchmark in the repository, the JAX implementation provides some serious improvements over the transformers implementation:
| OpenAI | Transformers | Whisper JAX | Whisper JAX | |
|---|---|---|---|---|
| Framework | PyTorch | PyTorch | JAX | JAX |
| Backend | GPU | GPU | GPU | TPU |
| 1 min | 13.8s | 4.54s | 1.72s | 0.45s |
| 10 min | 108.3s | 20.2s | 9.38s | 2.01s |
| 1 hour | 1001.0s | 126.1s | 75.3s | 13.8s |
For CPU it’s simply:
pip install "jax[cpu]==0.4.11"
For Cuda (GPU) you first need to install cuda-nvcc:
conda install cuda-nvcc -c nvidia
And then jax:
pip install jax==0.4.11
Finally we must install the library and cached_property:
pip install git+https://github.com/sanchit-gandhi/whisper-jax.git cached_property
After restarting our kernel, we can start using the pipeline:
from whisper_jax import FlaxWhisperPipline
import jax.numpy as jnp

jax_pipeline = FlaxWhisperPipline("openai/whisper-large-v2", dtype=jnp.float16)
The dtype should be set to jnp.float16 for most users, use jnp.bfloat16 for A100 GPU or TPU instances.
Now we can easily infere the pipeline. Let’s also add some timestamps:
timestamped_transcriptions = [jax_pipeline(sample["audio"], task="transcribe", return_timestamps=True) for sample in audio_data_samples]
That outputs:
[{'text': ' Joe Keaton disapproved of films and Buster also had reservations about the medium.', 'chunks': [{'timestamp': (0.0, 5.5), 'text': ' Joe Keaton disapproved of films and Buster also had reservations about the medium.'}]}, {'text': " She'll be alright.", 'chunks': [{'timestamp': (0.0, 2.0), 'text': " She'll be alright."}]}, {'text': ' Six.', 'chunks': [{'timestamp': (0.0, 2.0), 'text': ' Six.'}]}, {'text': ' All is well that ends well.', 'chunks': [{'timestamp': (0.0, 2.6), 'text': ' All is well that ends well.'}]}, {'text': ' It is a busy market town that serves a large surrounding area.', 'chunks': [{'timestamp': (0.0, 6.0), 'text': ' It is a busy market town that serves a large surrounding area.'}]}, {'text': ' The team had Olympic champion Carolina Marin in the squad for the season.', 'chunks': [{'timestamp': (0.0, 9.12), 'text': ' The team had Olympic champion Carolina Marin in the squad for the season.'}]}, {'text': ' Do you mean it?', 'chunks': [{'timestamp': (0.0, 6.0), 'text': ' Do you mean it?'}]}, {'text': ' The new patch is less invasive than the old one, but still causes regression.', 'chunks': [{'timestamp': (0.0, 6.0), 'text': ' The new patch is less invasive than the old one, but still causes regression.'}]}, {'text': ' How is Mozilla going to handle ambiguities like Q and Q?', 'chunks': [{'timestamp': (0.0, 7.0), 'text': ' How is Mozilla going to handle ambiguities like Q and Q?'}]}, {'text': ' Wish you the same happiness, bhakti.', 'chunks': [{'timestamp': (0.0, 3.0), 'text': ' Wish you the same happiness, bhakti.'}]}]
Now we can also create a dataset and push it to hub. Let’s create a new dataset just for comparison. Make sure to create the dataset here first:
from datasets import Dataset, Audio

jax_dataset = Dataset.from_dict({
    "audio": [(sample["audio"]) for sample in audio_data_samples],
    "transcription": [transcription["text"] for transcription in timestamped_transcriptions],
    "chunks": [transcription["chunks"] for transcription in timestamped_transcriptions]
}).cast_column("audio", Audio())

jax_dataset.push_to_hub("myuser/testsetjax", split="example")
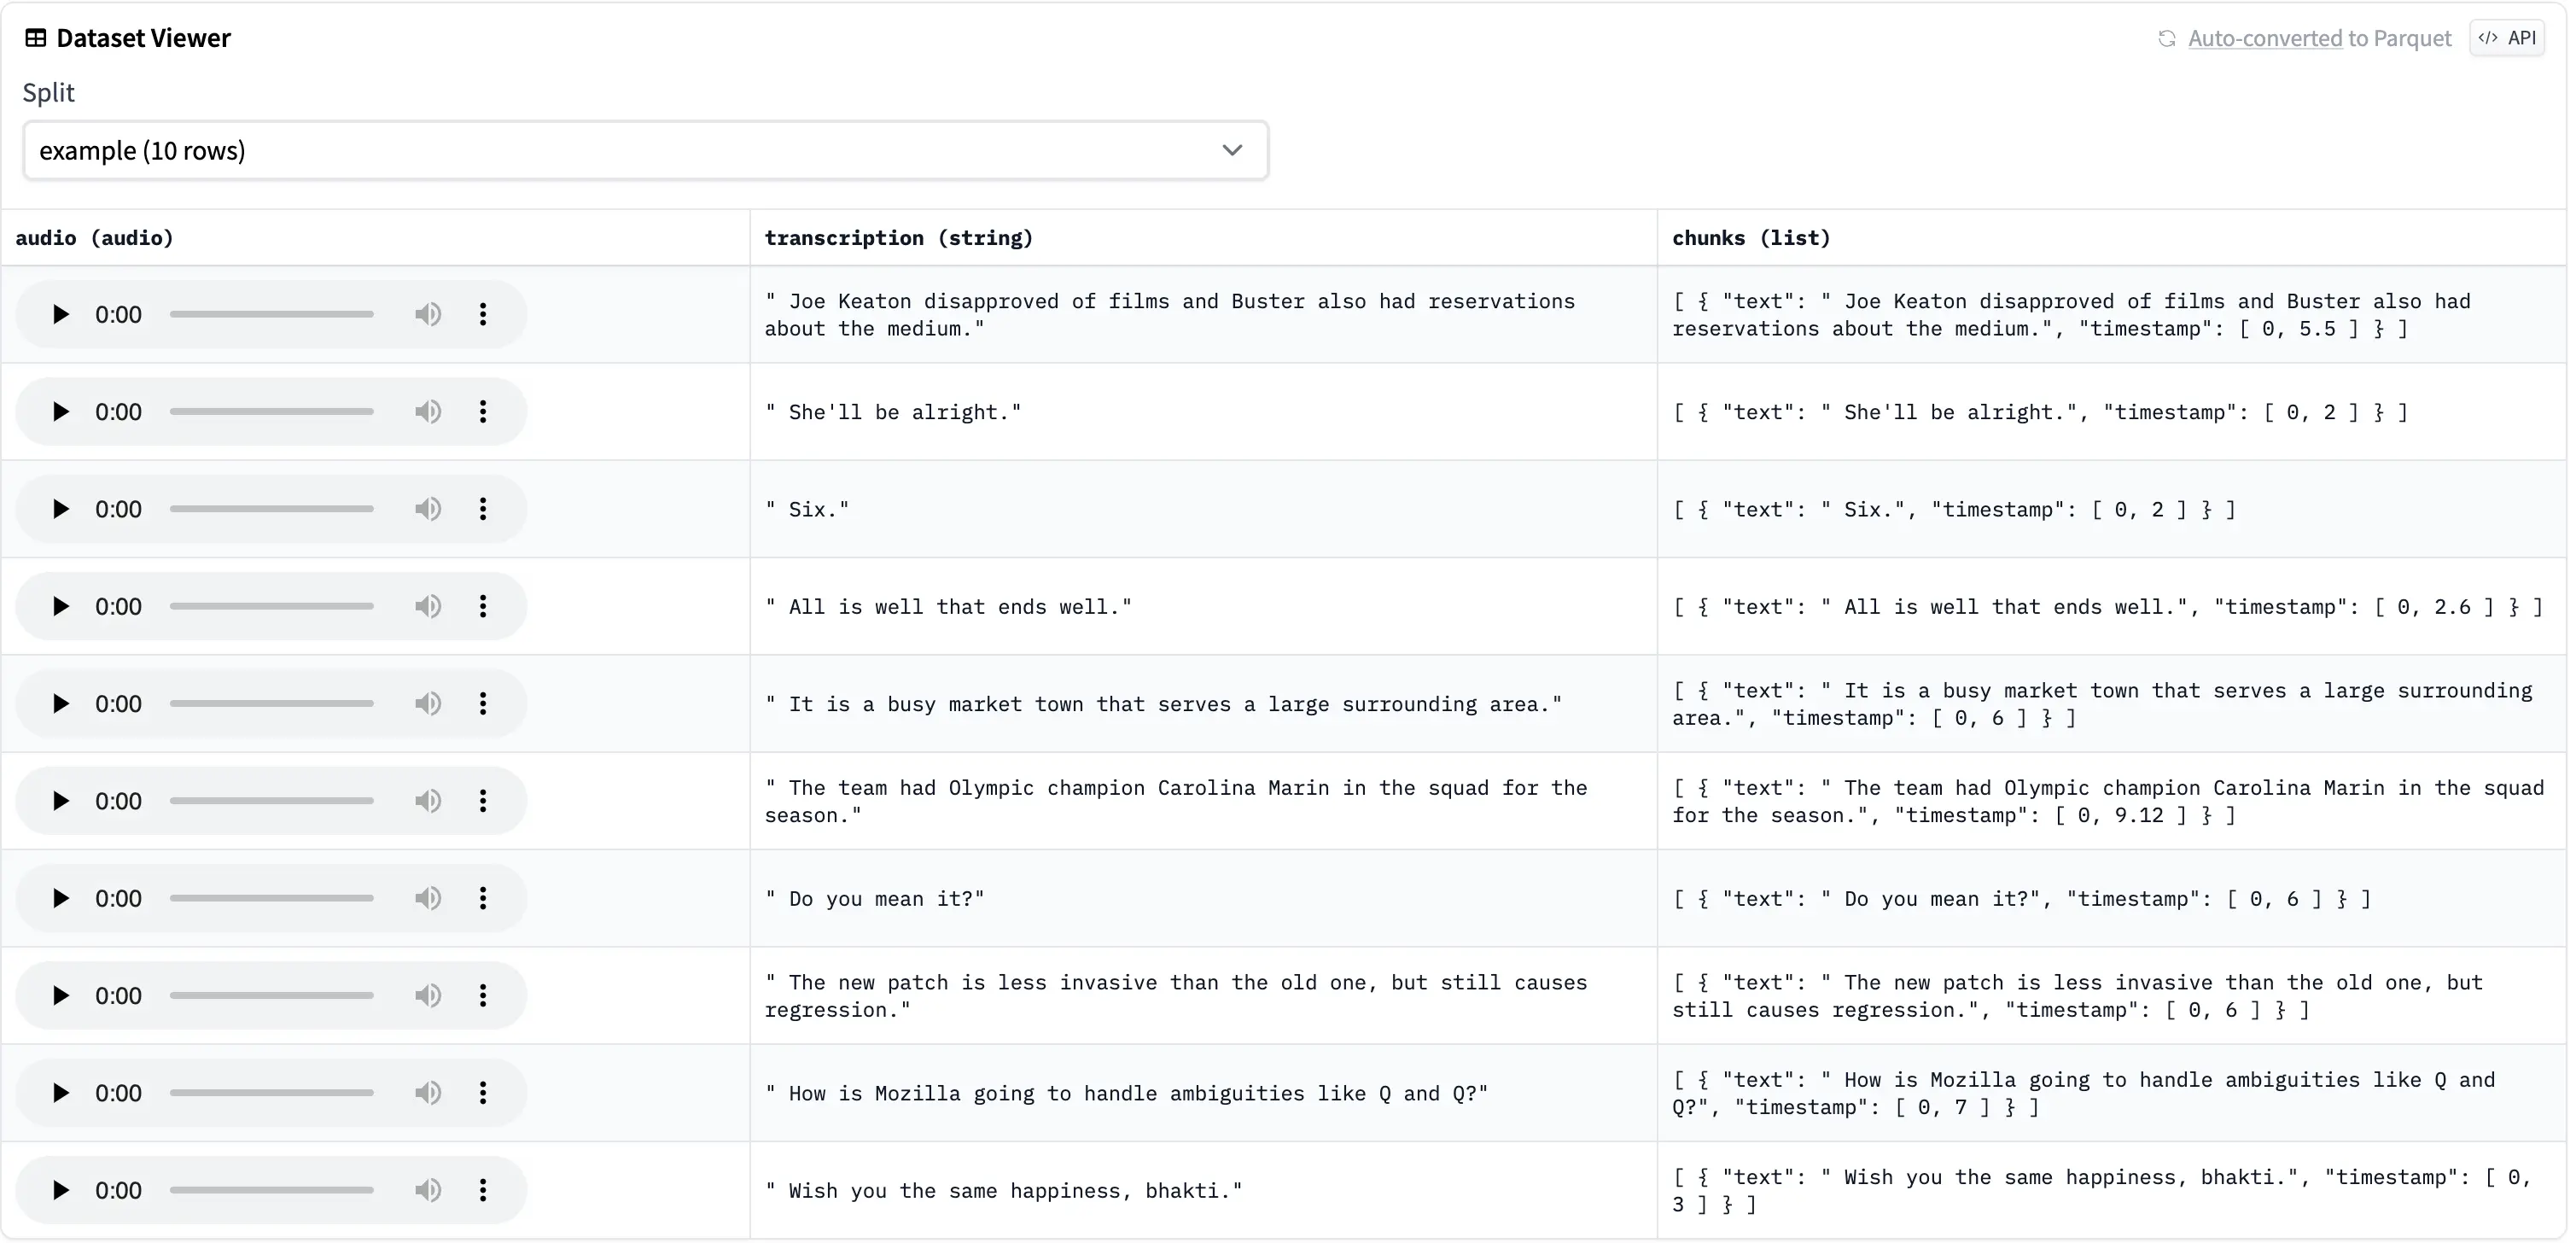
Great! Now we can inspect it using the Dataset Viewer again with the steps described previously by vising this page going to your Dataset and clicking on Go to Dataset Viewer.
This is how our example looks like now:
Using NeuraLumaWhisper
As we said in the introduction, we also prototyped and experimental Library called NeuraLumaWhisper. We created it, to make the creation of datasets and transcriptions faster and easier.
Currently, the implementation also builds upon Whisper JAX by Sanchit Gandhi but provides a CLI and a UI with options to transcribe videos, youtube urls and whole directories together. That may make it alot faster to start creating a fast dataset.
As it’s in a prototype experimental stage, it may change or may not be continued. However the Library is available under a MIT License, so feel free to take inspirations or build your own tooling based on our current codebase.
The installation is a lot more straightforward. First clone the repository:
git clone https://github.com/NeuraLuma/NeuraLumaWhisper
Then change into the directory:
cd NeuraLumaWhisper
Now deactivate your current conda environment and create one based on whether you use CPU or GPU:
conda deactivate
For GPU use:
conda env create -f environmentGPU.yaml
conda activate NeuraLumaWhisperGPU
For CPU use:
conda env create -f environmentCPU.yaml
conda activate NeuraLumaWhisperCPU
That’s it! Now you can use the library by using the provided options in the CLI or directly in the WebUI. Let’s start with the CLI. You can view all available options by running:
python main.py --help
As time of this making these are (Subject to change!):
options:
  -h, --help            show this help message and exit
  -s SOURCE, --source SOURCE
                        Path to the file(s) to be transcribed
  -y YOUTUBE, --youtube YOUTUBE
                        URL(s) of the YouTube video(s) to be transcribed, seperate with semicolon (';')
  -ld HF_LOAD_DATASET, --hf_load_dataset HF_LOAD_DATASET
                        HF dataset to load
  -ldc HF_LOAD_DATASET_COLUMN, --hf_load_dataset_column HF_LOAD_DATASET_COLUMN
                        HF dataset column to load
  -ldr HF_LOAD_DATASET_REVISION, --hf_load_dataset_revision HF_LOAD_DATASET_REVISION
                        HF dataset revision to load
  -ldst HF_LOAD_DATASET_SUBSET, --hf_load_dataset_subset HF_LOAD_DATASET_SUBSET
                        HF dataset subset to load
  -ldsp HF_LOAD_DATASET_SPLIT, --hf_load_dataset_split HF_LOAD_DATASET_SPLIT
                        HF dataset split to load
  -o OUTPUT, --output OUTPUT
                        Path to the directory for the transcribed files
  -sd HF_SAVE_DATASET, --hf_save_dataset HF_SAVE_DATASET
                        HF dataset Hub Id to save to e.g. my_user/my_dataset
  -sdp {True,False}, --hf_save_dataset_private {True,False}
                        Set whether the HF dataset is private
  -sdca HF_SAVE_DATASET_COLUMN_AUDIO, --hf_save_dataset_column_audio HF_SAVE_DATASET_COLUMN_AUDIO
                        HF dataset column to save audio to
  -sdct HF_SAVE_DATASET_COLUMN_TEXT, --hf_save_dataset_column_text HF_SAVE_DATASET_COLUMN_TEXT
                        HF dataset column to save text to
  -sdcsbv HF_SAVE_DATASET_COLUMN_TEXT_SBV, --hf_save_dataset_column_text_sbv HF_SAVE_DATASET_COLUMN_TEXT_SBV
                        HF dataset column to save text with (SBV formatted) timestamps to
  -sdr HF_SAVE_DATASET_REVISION, --hf_save_dataset_revision HF_SAVE_DATASET_REVISION
                        HF dataset revision to save to
  -sdsp HF_SAVE_DATASET_SPLIT, --hf_save_dataset_split HF_SAVE_DATASET_SPLIT
                        HF dataset split to save to
  -ts, --timestamp      Activates timestamps. Adds a seperate file with sbv extension
  -tl, --translate      Sets the mode to translation
  -d {float16,bfloat16,float32,float64}, --dtype {float16,bfloat16,float32,float64}
                        Sets the dtype to use
  -b BATCH_SIZE, --batch_size BATCH_SIZE
                        Sets the batch size for inference
  -hfc HF_CHECKPOINT, --hf_checkpoint HF_CHECKPOINT
                        Sets the hf checkpoint to use
For explanations of the options, feel free to read the README.
Please also note that, other than the previous two options, streaming of datasets is not build in. So if you try to load a huge dataset, it may download a huge chunk of data. We may change this in the future, but as time of this writing, this hasn’t been added.
For testing purposes, let’s just load in our previous dataset from the jax part of this guide:
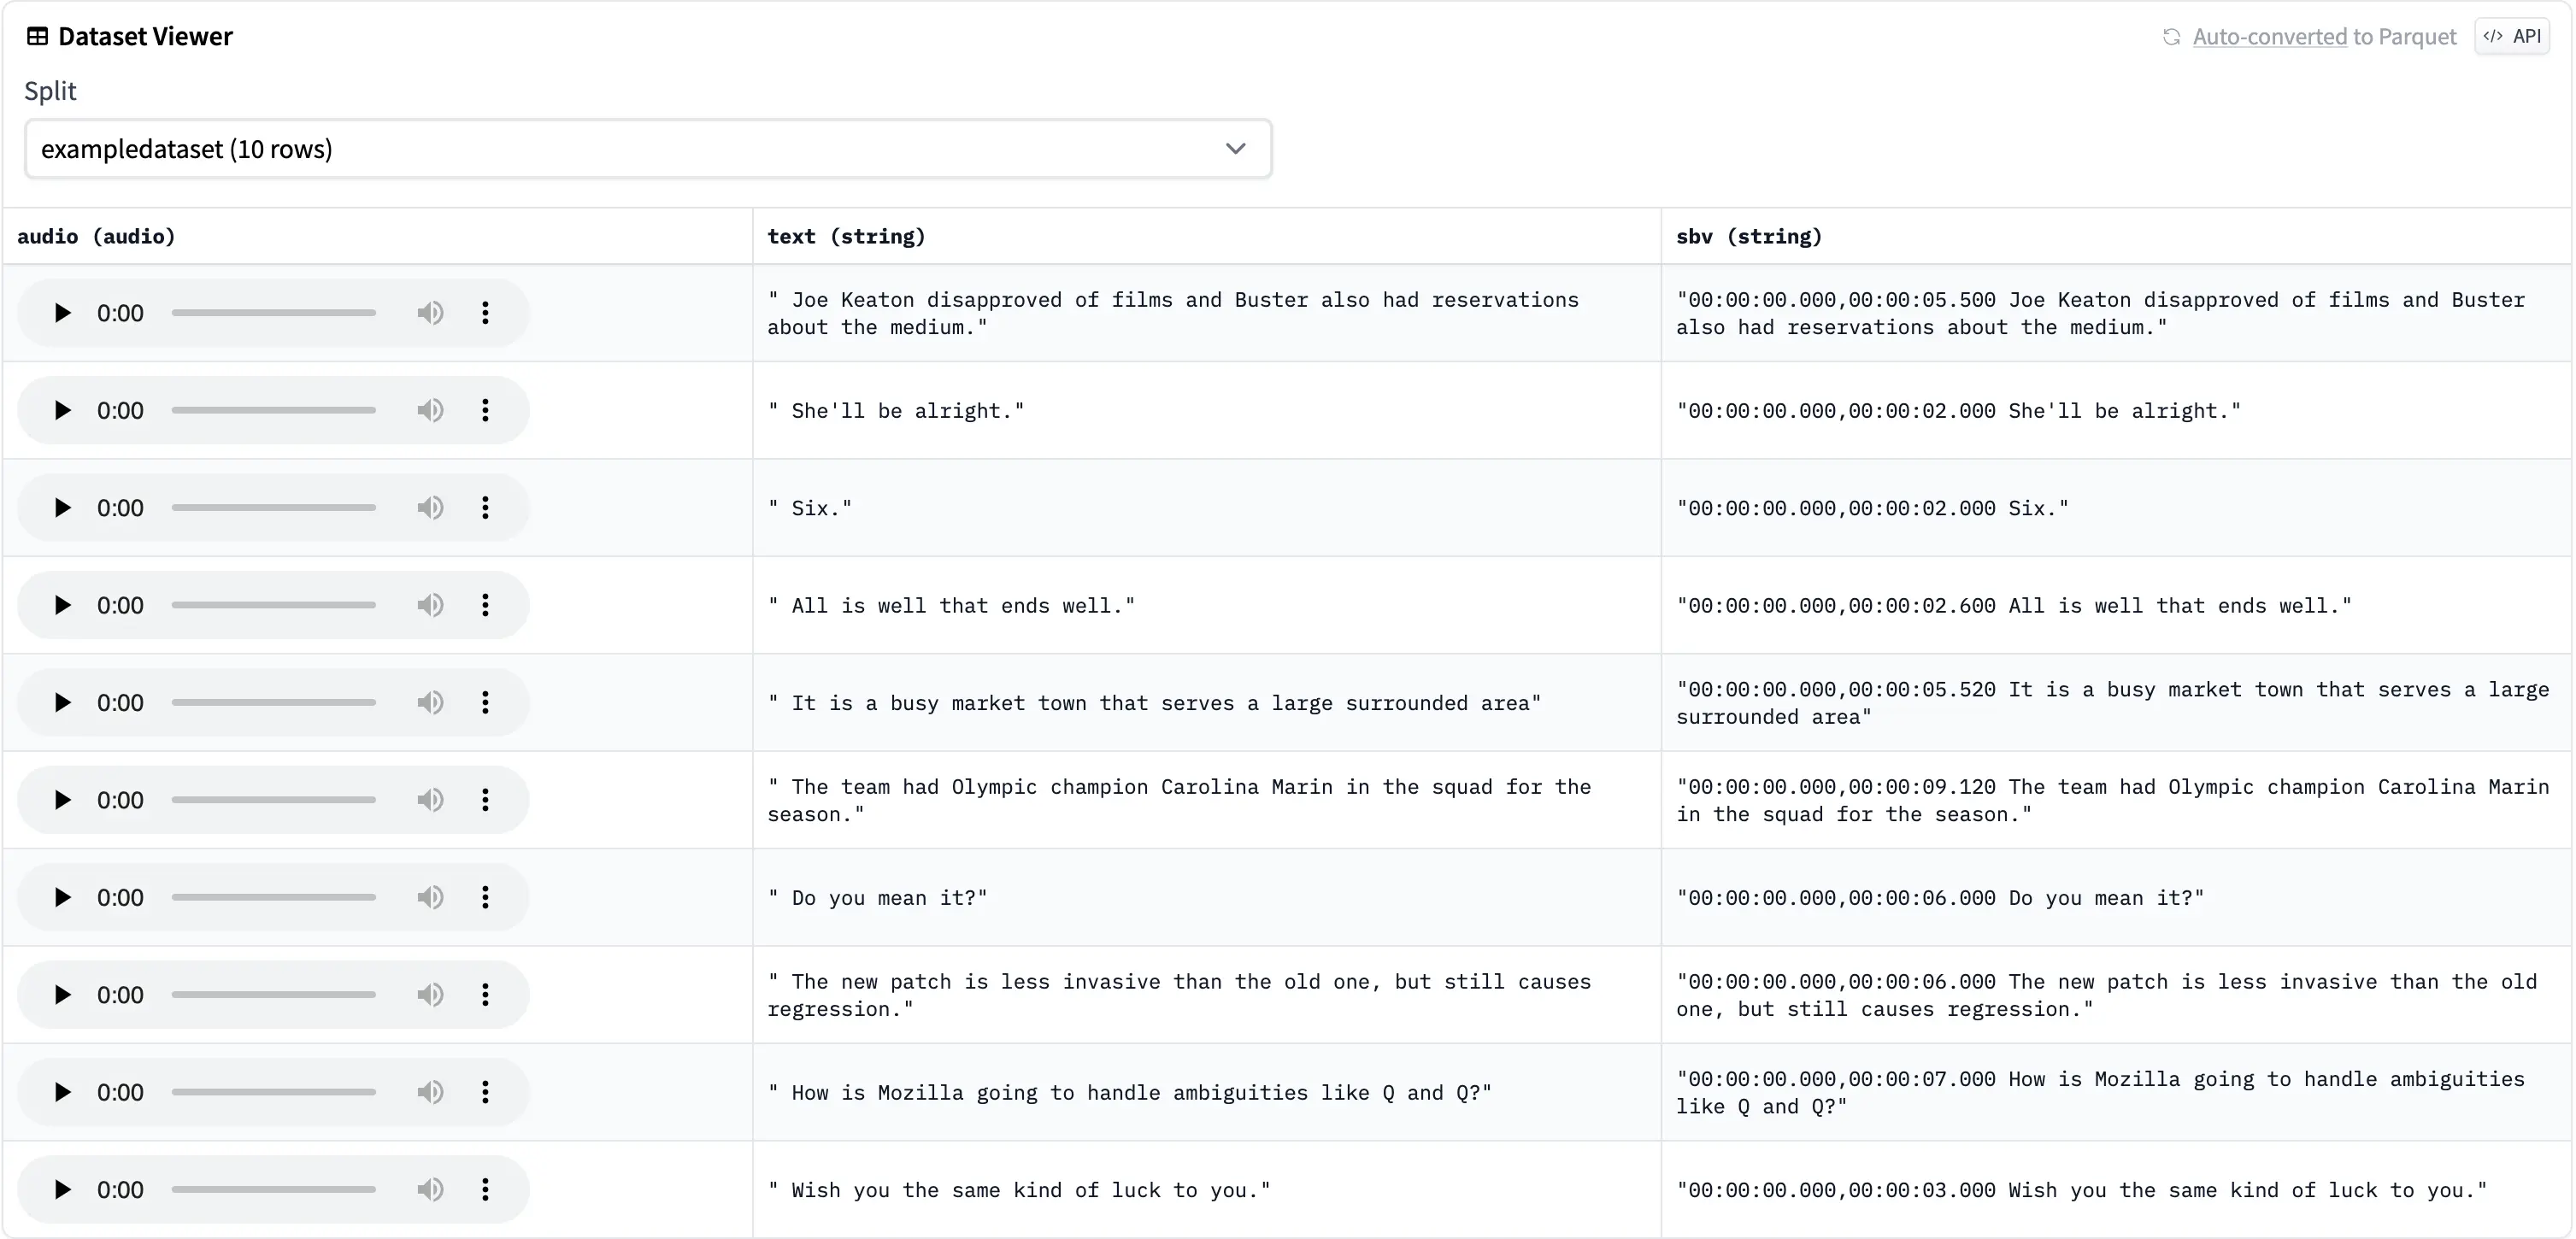
python main.py -ld "myuser/testsetjax" -ldsp "example" -o "test/out" -sd "myuser/testsetneuraluma" -sdsp "exampledataset" -ts
This will load our testsetjax and output transcriptions within the current directory under text/out. We also save a new dataset to myuser/testsetneuraluma. As we specified the -ts option, we will also save timestamped transcription files, as well as add a column in the saved dataset. Also note, that the timestamps are converted to the sbv format rather than saving the chunks as a text or json file.
Make sure to create your dataset before trying to save it to the hub here.
This is how it would look like in the Data Viewer:
You may also specify the -s option as well or instead, to load a .mp3 or .mp4 file directly or a directory containing the files. Those will be automagically transcribed:
python main.py -s "test/files-to-transcribe" -o "test/out" -sd "myuser/testsetneuraluma" -sdsp "exampledir" -ts
YouTube Urls can also be specified using the -y flag. Please make sure your usecase does not violate the YouTube TOS and you have the rights to use the data for your purposes. Here is an example for that:
python main.py -y "https://www.youtube.com/watch?v=JXkWbSSe5MY&t=2s;https://www.youtube.com/watch?v=AKf9RkA_iEs" -o "test/out" -sd "myuser/testsetneuraluma" -sdsp "exampleyt" -ts
To use the WebUI simply run:
python app.py
This will display a URL that you can open in your Browser (most of the time it should be http://127.0.0.1:7860).
The UI should look similar to this:
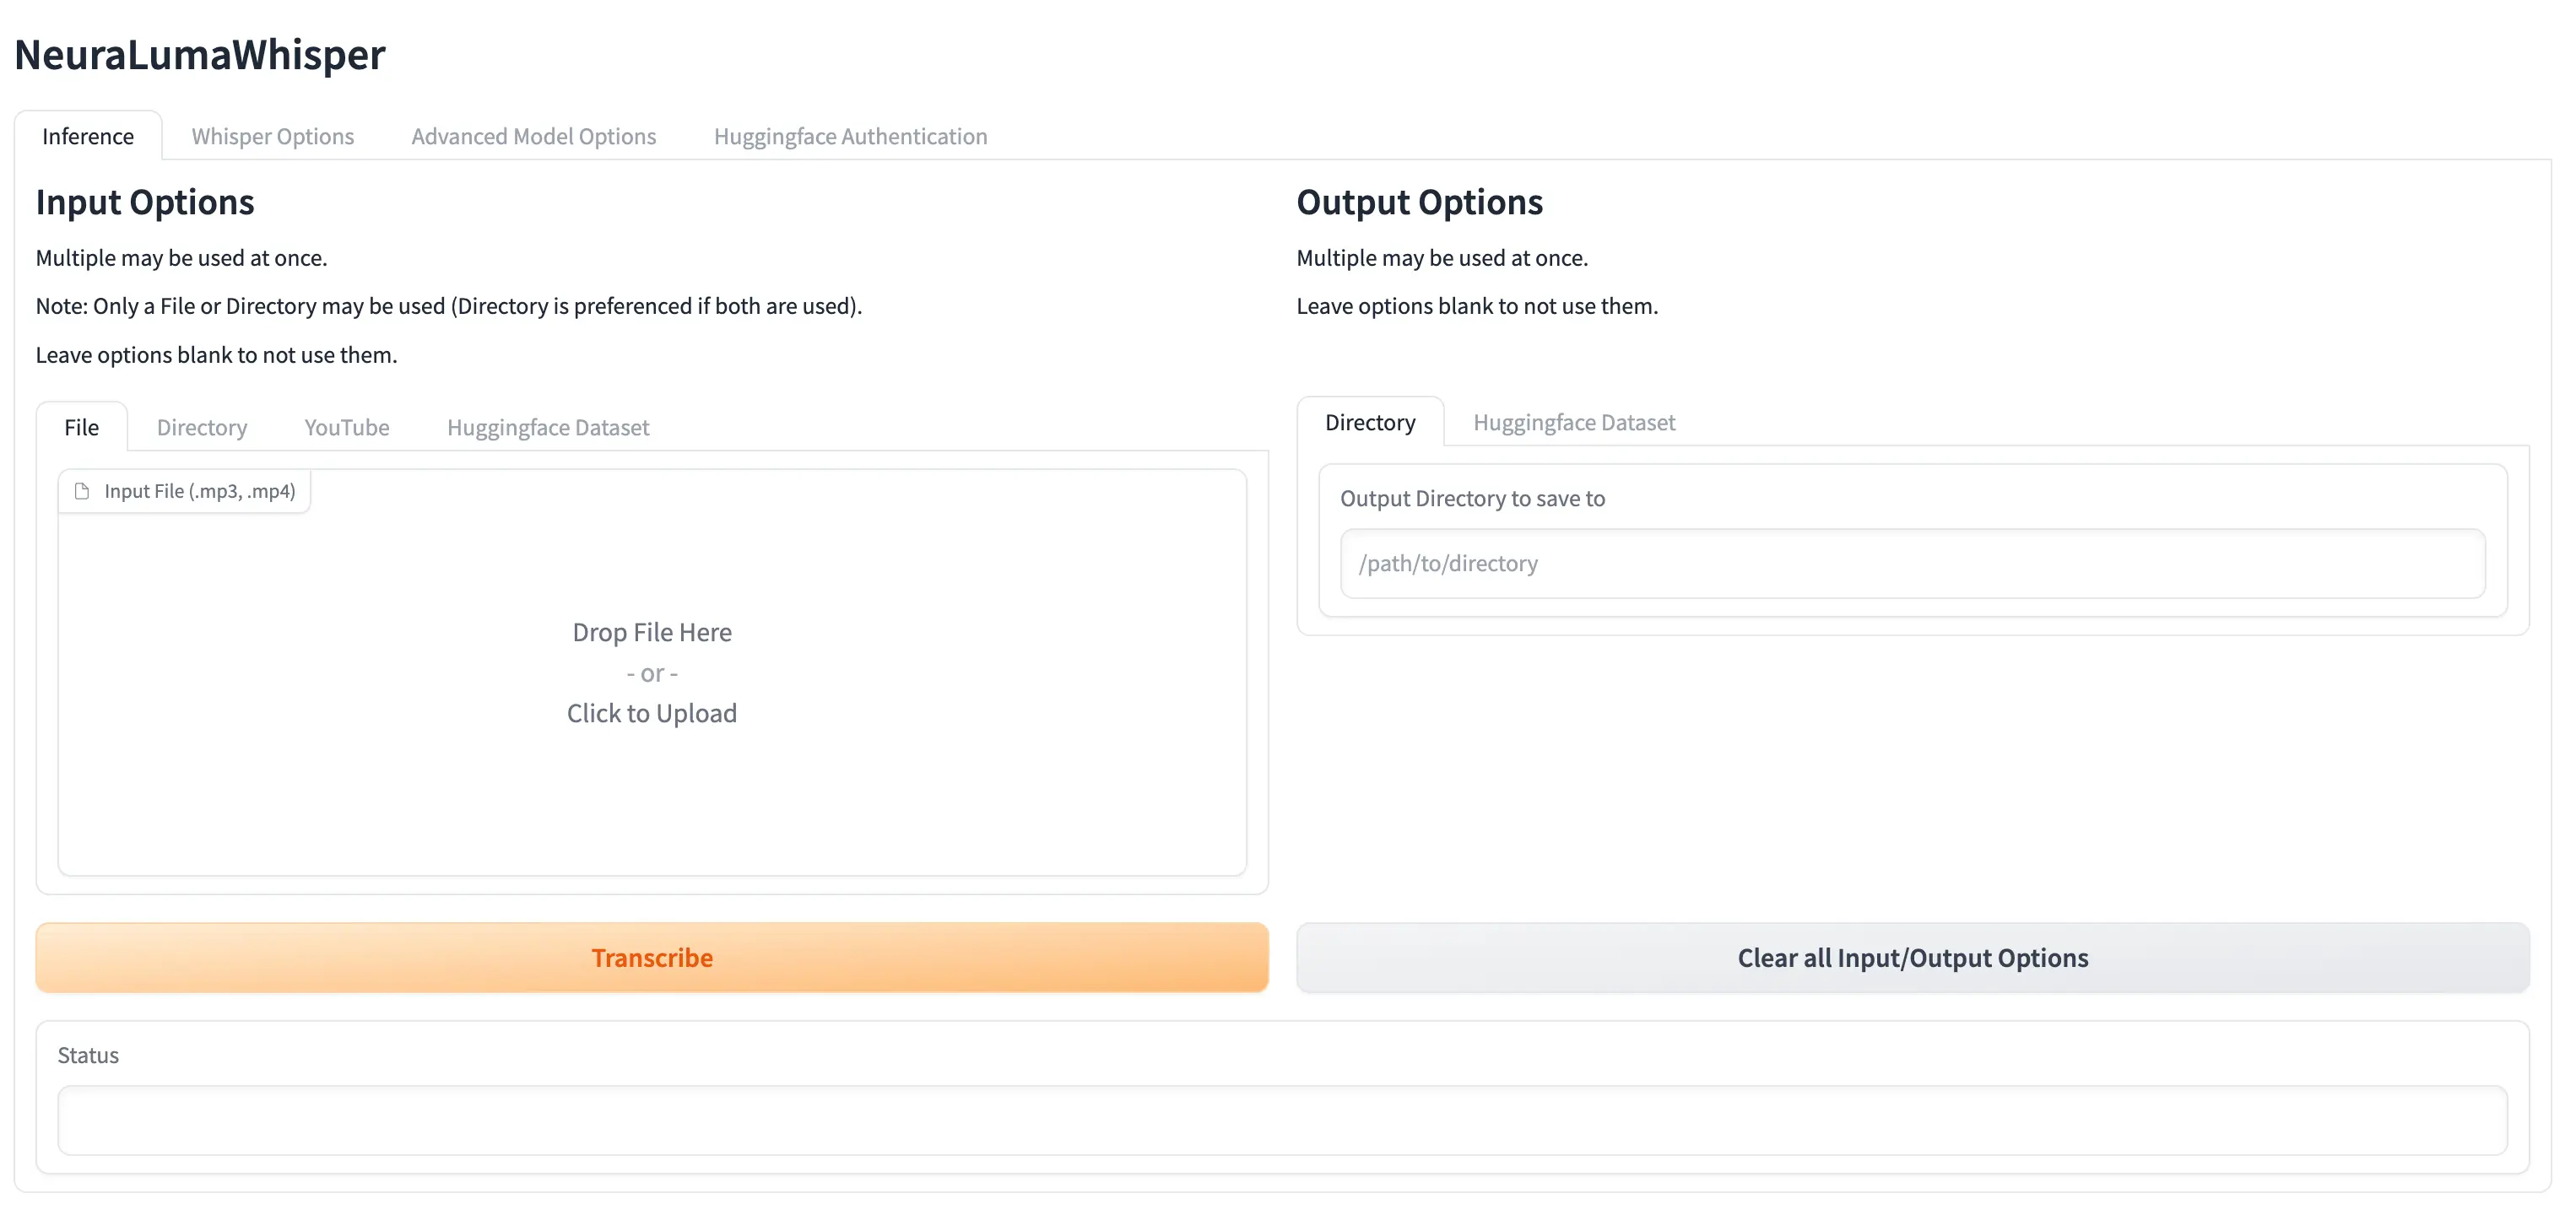
The options in the CLI are also available in the UI. Feel free to Experiment and check out each tab.
Conclusion
In this tutorial, we have introduced you to the process of creating text-audio datasets using the Whisper Automatic Speech Recognition (ASR) system. We have shown how to do it in pure Python using HuggingFace’s Transformer Library and also using an adapted, faster version in JAX. We have also introduced our own experimental library, NeuraLumaWhisper, which provides a more user-friendly interface for dataset creation.
We hope this tutorial has been helpful for you to start your own text-audio dataset creation journey. Whether you are creating a voice cloning tool, a conversation navigator, or any other application requiring ASR, having a high-quality, custom dataset is the key to success. Feel free to check out our repository to find the notebook that we used in this tutorial!

